Valve mod - pcp pistol |
Post Reply 
|
Page 123 6> |
| Author | |
Pauly5 
Forum Moderator 
Joined: 11 Mar 2013 Location: Titahi Bay Status: Offline Posts: 1756 |
 Post Options Post Options
") Thanks(0) Thanks(0)
 Quote Reply Quote Reply
 Topic: Valve mod - pcp pistol Topic: Valve mod - pcp pistolPosted: 04 Sep 2024 at 3:41pm |
|
After a long break from doing anything creative I have started on a new pistol build. This time I am making the valve differently. After some advice from fellow gunners and also copying a proven design I started.
Instead of trying to form a good seal on a surface within the valve body I am making the valve seat out of stainless and it will sit in the body, but can be removed/replaced if needed. You will see in the photo an FX Bobcat valve stem and seat, and next to it my valve seat with O ring groove cut into it and the valve body behind. Next stage is the valve stem with sealing surface. 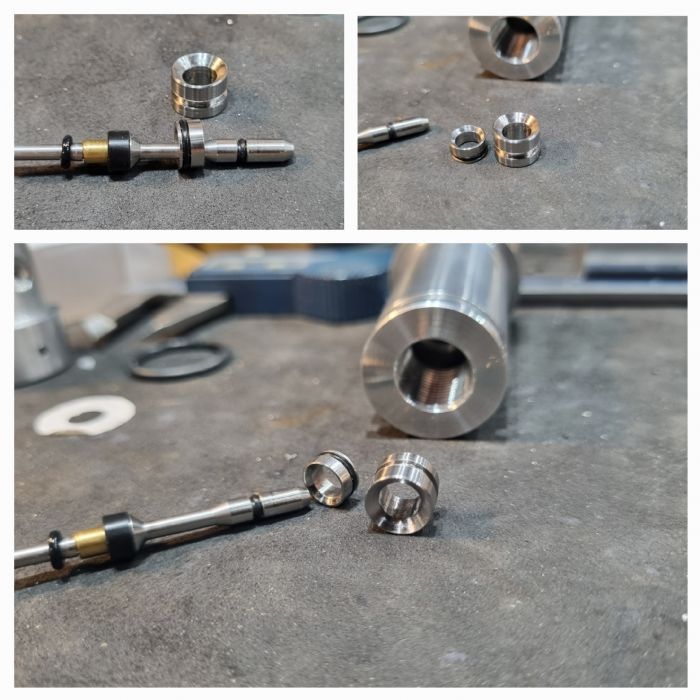 |
|
 |
|
|
nunga
Admin 

Joined: 09 Mar 2013 Location: Pukekohe Status: Offline Posts: 1130 |
Post Options
Thanks(0)
Quote Reply
Posted: 05 Sep 2024 at 2:48am |
|
what are you making the value out of?
|
|
|
2nd place HP springer - WFTF World Championships 2014
|
|
|
|
|
Pauly5
Forum Moderator
Joined: 11 Mar 2013 Location: Titahi Bay Status: Offline Posts: 1756 |
Post Options
Thanks(0)
Quote Reply
Posted: 05 Sep 2024 at 3:03am |
|
Valve body out of aluminium, the seat made out of stainless and I will use stainless for the opposing valve pin seat too.
My plan is to make the pin out of a screw driver shaft and then use valve grinding paste to bed them in with each other. That's the plan. I could make the whole pin and seat out of stainless, but I wasn't sure how well it will handle being struck by the hammer, where the screwdriver shaft is hardened.
|
|
|
|
|
kruzaroad
Senior Member 

Joined: 03 Jul 2022 Location: Hastings 4 now Status: Offline Posts: 3035 |
Post Options
Thanks(0)
Quote Reply
Posted: 05 Sep 2024 at 3:30am |
|
Question, would chisel shaft be better?, as they are designed to take to be hit.
You puting a regulator on it? |
|
|
|
|
J-S
Senior Member
Joined: 20 Oct 2014 Location: Auckland Status: Offline Posts: 512 |
Post Options
Thanks(0)
Quote Reply
Posted: 05 Sep 2024 at 3:54am |
|
ooh looks interesting
|
|
|
J S Airguns
Air Arms TX200('s) Theoben Sirocco HW77 FWB 300s Webley Patriot One or two others... Current projects: Too many.. |
|
|
|
|
Pauly5
Forum Moderator
Joined: 11 Mar 2013 Location: Titahi Bay Status: Offline Posts: 1756 |
Post Options
Thanks(0)
Quote Reply
Posted: 05 Sep 2024 at 4:02am |
|
The pin is around 3 - 4mm dia, so while a chisel material is perfect, it's too big.
|
|
|
|
|
xyon
Senior Member

Joined: 21 Dec 2016 Location: Canterbury Status: Offline Posts: 135 |
Post Options
Thanks(0)
Quote Reply
Posted: 05 Sep 2024 at 4:41am |
|
If you need to machine the valve then a steel than can be annealed and hardened is good. I've a used Class 10.9 or was it 12.9 bolt as they are strong but still machinable with HSS tooling.
|
|
|
---
My favourites springer - Diana 52 PCP - FX Wildcat III |
|
|
|
|
nunga
Admin
Joined: 09 Mar 2013 Location: Pukekohe Status: Offline Posts: 1130 |
Post Options
Thanks(0)
Quote Reply
Posted: 05 Sep 2024 at 4:57am |
|
The screwdriver shaft is not hardened only the tips are hardened steel. and you would find it very difficult to machine the hardened steel anyway. you will need grind it. If it was me doing it i would be looking into 316 stainless for the valve and bronze alloy or brass for the seat. I have both here if you want to play with that. I have 10 and 20mm round 316 bar here. can easily make what ever bronze alloy you want. Just a thought.
|
|
|
2nd place HP springer - WFTF World Championships 2014
|
|
|
|
|
Pauly5
Forum Moderator
Joined: 11 Mar 2013 Location: Titahi Bay Status: Offline Posts: 1756 |
Post Options
Thanks(0)
Quote Reply
Posted: 05 Sep 2024 at 5:06am |
|
Thanks Xyon, that makes sense, I might go that way. I know I could use HSS drill shanks too, then use the relevant reamer for the hole. But I have no reamers at this stage.
Kruz, I would like to put a reg into it, but they cost about $70 to $80 Euro + delivery each. I should be able to fit one at a later date as the way I have made the body should provide a plenum. |
|
|
|
|
Pauly5
Forum Moderator
Joined: 11 Mar 2013 Location: Titahi Bay Status: Offline Posts: 1756 |
Post Options
Thanks(0)
Quote Reply
Posted: 05 Sep 2024 at 5:14am |
Of course, hadn't thought of brass or bronze. That would make sense. With the screw driver shaft I don't need to change the diameter at all. I just cut to length then harden it. Giving it a polish afterwards. I have about 1% metallurgy knowledge, but heat to cherry red or non ferrous state and quench in oil. I have some 8 and 10 mm 316 round bar, but might take you up on the bronze alloy. Would only need a few small pieces.
|
|
|
|
|
nunga
Admin
Joined: 09 Mar 2013 Location: Pukekohe Status: Offline Posts: 1130 |
Post Options
Thanks(0)
Quote Reply
Posted: 05 Sep 2024 at 5:33am |
|
I would highly recommend the bronze alloy as you have to take into account for bimetallic corrosion if you were to use a screwdriver shaft with a stainless steel seat. it would rust out very quickly or weld itself together. be very careful when mixing your ferrous metals
|
|
|
2nd place HP springer - WFTF World Championships 2014
|
|
|
|
|
Pauly5
Forum Moderator
Joined: 11 Mar 2013 Location: Titahi Bay Status: Offline Posts: 1756 |
Post Options
Thanks(0)
Quote Reply
Posted: 05 Sep 2024 at 6:02am |
|
Cool, great info.
In the past, I have used delrin on the shaft which has worked well, but I was thinking of keeping the HP side of the valve stem to a minimum using metal which means the metal head can be made smaller and more streamlined. I quote some advice given below. "Therefore you can reduce both major closing forces on the valve:" 1) reducing the static pressure on the valve stem 2) reducing the dynamic pressure on the valve head
|
|
|
|
|
RangerPete
Senior Member

Joined: 19 Apr 2023 Location: Cambridge. Status: Offline Posts: 1106 |
Post Options
Thanks(0)
Quote Reply
Posted: 05 Sep 2024 at 6:05am |
|
Interesting thread Pauly.
Is this going to be another crossman modification? And what caliber are you using? |
|
|
Walk quietly, but carry a big stick.
|
|
|
|
|
Pauly5
Forum Moderator
Joined: 11 Mar 2013 Location: Titahi Bay Status: Offline Posts: 1756 |
Post Options
Thanks(0)
Quote Reply
Posted: 05 Sep 2024 at 6:23am |
I am trying to make as much as I can, but will use a Crosman trigger frame and barrel. I have a steel breech which will save a lot of time, but would like to make a custom breech with a straight pull bolt that has a locking action rather than drop into a slot. very similar to my last build. That way I could get a little creative with open sights maybe. It'll be .22. I do have a .25 cal FX barrel off an old Bobcat, but of course it'll need chopping down, but had thought about using that for a rifle build.
|
|
|
|
|
xyon
Senior Member
Joined: 21 Dec 2016 Location: Canterbury Status: Offline Posts: 135 |
Post Options
Thanks(1)
Quote Reply
Posted: 05 Sep 2024 at 6:42am |
Hi, I don't think 316 would be hard enough for the valve stem/shaft, well that would depend of course on how hard you need to hit it and the diameter. FX valve stems (among others) have been known break  |
|
|
---
My favourites springer - Diana 52 PCP - FX Wildcat III |
|
|
|
|
Post Reply
|
Page 123 6> |
 Tweet
Tweet
|
| Forum Jump | Forum Permissions You cannot post new topics in this forum You cannot reply to topics in this forum You cannot delete your posts in this forum You cannot edit your posts in this forum You cannot create polls in this forum You cannot vote in polls in this forum |


 Topic Options
 nunga wrote: