Valve mod - pcp pistol
Printed From: Kiwi Airgunners
Category: Technical
Forum Name: Pauly's Technical Area
Forum Description: Technical information, Modifications and DIY projects are all in here
URL: www.kiwiairgunners.co.nz/forum_posts.asp?TID=1078
Printed Date: 16 Jun 2026 at 4:07am
Software Version: Web Wiz Forums 10.14 - http://www.webwizforums.com
Topic: Valve mod - pcp pistol
Posted By: Pauly5
Subject: Valve mod - pcp pistol
Date Posted: 04 Sep 2024 at 3:41pm
|
After a long break from doing anything creative I have started on a new pistol build. This time I am making the valve differently. After some advice from fellow gunners and also copying a proven design I started. Instead of trying to form a good seal on a surface within the valve body I am making the valve seat out of stainless and it will sit in the body, but can be removed/replaced if needed. You will see in the photo an FX Bobcat valve stem and seat, and next to it my valve seat with O ring groove cut into it and the valve body behind. Next stage is the valve stem with sealing surface. 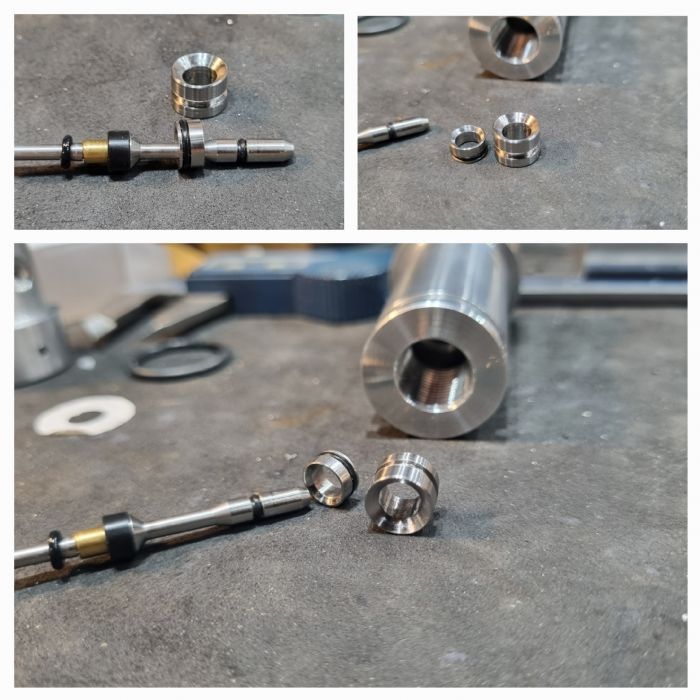 |
Replies:
Posted By: nunga
Date Posted: 05 Sep 2024 at 2:48am
|
what are you making the value out of? ------------- 2nd place HP springer - WFTF World Championships 2014 |
Posted By: Pauly5
Date Posted: 05 Sep 2024 at 3:03am
|
Valve body out of aluminium, the seat made out of stainless and I will use stainless for the opposing valve pin seat too. My plan is to make the pin out of a screw driver shaft and then use valve grinding paste to bed them in with each other. That's the plan. I could make the whole pin and seat out of stainless, but I wasn't sure how well it will handle being struck by the hammer, where the screwdriver shaft is hardened.
|
Posted By: kruzaroad
Date Posted: 05 Sep 2024 at 3:30am
|
Question, would chisel shaft be better?, as they are designed to take to be hit. You puting a regulator on it? |
Posted By: J-S
Date Posted: 05 Sep 2024 at 3:54am
|
ooh looks interesting ------------- https://www.instagram.com/js_airguns/" rel="nofollow - J S Airguns Air Arms TX200('s) Theoben Sirocco HW77 FWB 300s Webley Patriot One or two others... Current projects: Too many.. |
Posted By: Pauly5
Date Posted: 05 Sep 2024 at 4:02am
| The pin is around 3 - 4mm dia, so while a chisel material is perfect, it's too big. |
Posted By: xyon
Date Posted: 05 Sep 2024 at 4:41am
|
If you need to machine the valve then a steel than can be annealed and hardened is good. I've a used Class 10.9 or was it 12.9 bolt as they are strong but still machinable with HSS tooling. ------------- --- My favourites springer - Diana 52 PCP - FX Wildcat III |
Posted By: nunga
Date Posted: 05 Sep 2024 at 4:57am
|
The screwdriver shaft is not hardened only the tips are hardened steel. and you would find it very difficult to machine the hardened steel anyway. you will need grind it. If it was me doing it i would be looking into 316 stainless for the valve and bronze alloy or brass for the seat. I have both here if you want to play with that. I have 10 and 20mm round 316 bar here. can easily make what ever bronze alloy you want. Just a thought. ------------- 2nd place HP springer - WFTF World Championships 2014 |
Posted By: Pauly5
Date Posted: 05 Sep 2024 at 5:06am
|
Thanks Xyon, that makes sense, I might go that way. I know I could use HSS drill shanks too, then use the relevant reamer for the hole. But I have no reamers at this stage. Kruz, I would like to put a reg into it, but they cost about $70 to $80 Euro + delivery each. I should be able to fit one at a later date as the way I have made the body should provide a plenum. |
Posted By: Pauly5
Date Posted: 05 Sep 2024 at 5:14am
Of course, hadn't thought of brass or bronze. That would make sense. With the screw driver shaft I don't need to change the diameter at all. I just cut to length then harden it. Giving it a polish afterwards. I have about 1% metallurgy knowledge, but heat to cherry red or non ferrous state and quench in oil. I have some 8 and 10 mm 316 round bar, but might take you up on the bronze alloy. Would only need a few small pieces.
|
 nunga wrote:
Posted By: nunga
Date Posted: 05 Sep 2024 at 5:33am
|
I would highly recommend the bronze alloy as you have to take into account for bimetallic corrosion if you were to use a screwdriver shaft with a stainless steel seat. it would rust out very quickly or weld itself together. be very careful when mixing your ferrous metals ------------- 2nd place HP springer - WFTF World Championships 2014 |
Posted By: Pauly5
Date Posted: 05 Sep 2024 at 6:02am
|
Cool, great info. In the past, I have used delrin on the shaft which has worked well, but I was thinking of keeping the HP side of the valve stem to a minimum using metal which means the metal head can be made smaller and more streamlined. I quote some advice given below. "Therefore you can reduce both major closing forces on the valve:" 1) reducing the static pressure on the valve stem 2) reducing the dynamic pressure on the valve head
|
Posted By: RangerPete
Date Posted: 05 Sep 2024 at 6:05am
|
Interesting thread Pauly. Is this going to be another crossman modification? And what caliber are you using? ------------- Walk quietly, but carry a big stick. |
Posted By: Pauly5
Date Posted: 05 Sep 2024 at 6:23am
I am trying to make as much as I can, but will use a Crosman trigger frame and barrel. I have a steel breech which will save a lot of time, but would like to make a custom breech with a straight pull bolt that has a locking action rather than drop into a slot. very similar to my last build. That way I could get a little creative with open sights maybe. It'll be .22. I do have a .25 cal FX barrel off an old Bobcat, but of course it'll need chopping down, but had thought about using that for a rifle build.
|
Posted By: xyon
Date Posted: 05 Sep 2024 at 6:42am
Hi, I don't think 316 would be hard enough for the valve stem/shaft, well that would depend of course on how hard you need to hit it and the diameter. FX valve stems (among others) have been known break  ------------- --- My favourites springer - Diana 52 PCP - FX Wildcat III |
Posted By: nunga
Date Posted: 07 Sep 2024 at 5:35am
|
Paul Flick me your address and ill get that bronze sent to you. I will be doing a smelt over the weekend and i will make some bronze while i have the furnace cranked up ------------- 2nd place HP springer - WFTF World Championships 2014 |
Posted By: BC_Clark
Date Posted: 07 Sep 2024 at 11:20am
|
A thing about dissimilar metal corrosion is it depends on the ratio of surface areas of each metal. A stainless seat in an aluminium airgun could have no issues but an aluminium seat in a stainless airgun would be at high risk. Look up the galvanic series and make sure that the most reactive metal makes up the vast majority. I find 385 brass to be very good for seats. It machines and polishes well. Bronzes can be more tricky. |
Posted By: nunga
Date Posted: 07 Sep 2024 at 11:49am
|
Thats because 385 brass as a lot of lead (around 3%) compared with other types of brass which makes it very good for machining it is also know as free machining brass. But it is a lot softer as well so i dont know how it would handle been used on HPA valve seat. If you have had good results using it BC_Clark then i would be happy to mix up a batch for you paul, like i said i have everything here and i will be smelting other stuff this weekend anyway. ------------- 2nd place HP springer - WFTF World Championships 2014 |
Posted By: BC_Clark
Date Posted: 08 Sep 2024 at 1:50pm
Some of my most powerful and highly stressed valves have been with 385 brass seats so I can say that normal HPA usage is no challenge. |
Posted By: Pauly5
Date Posted: 08 Sep 2024 at 2:26pm
| So should I remake that valve seat in brass and the harder material for the moving part of the valve. Poppet valve? |
Posted By: Pauly5
Date Posted: 10 Sep 2024 at 4:06pm
|
Well I tried cutting one of my donor screw drivers and it was hard. The hacksaw had trouble biting into it. It made a small nick, so I just put it in the vice and it snapped on the nick. Doing pest control I was always up in ceilings and sparkies often forget stuff and they do like to have expensive screwdrivers which are decenyly hardened. So I have a couple I can wreck. So this will be my valve stem. 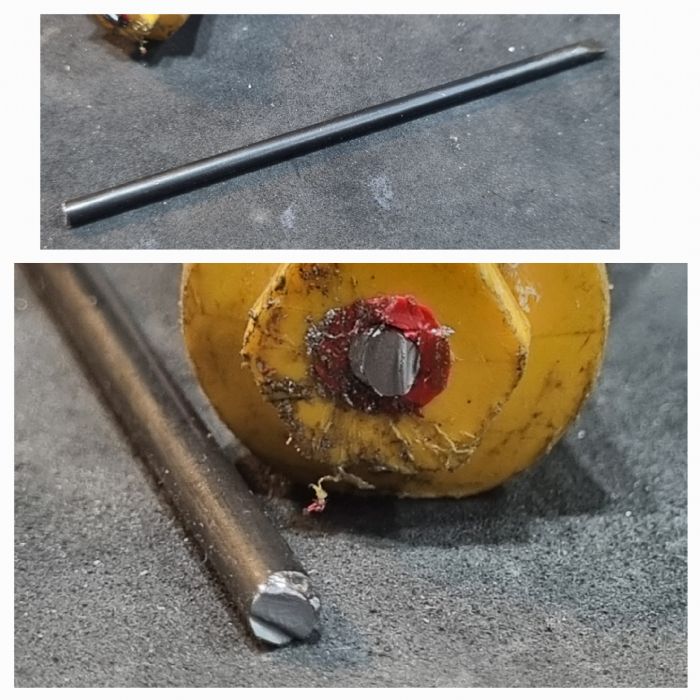 |
Posted By: RangerPete
Date Posted: 10 Sep 2024 at 5:08pm
|
Good luck with that 😂 ------------- Walk quietly, but carry a big stick. |
Posted By: Pauly5
Date Posted: 19 Sep 2024 at 3:50pm
|
Slowly doing stuff. NZ Post has botched up Nunga's foundry delivery, so valve on hold. I bought a piece of 3.9 mm piano wire today. Pretty hard, and hopefully harden up, but I might try that for the valve stem. I also decided to use the .25 cal FX barrel I had. It was off a Bobcat. I cut it down and reduced the breech end to fit into what will be the breech block for this build. Fits nice and snug with no movement. FX only rifled the last 2 or 3 inches of these barrels and you can see that they make the muzzle smaller diameter to do this, then thread on a piece to match. You can see the marks on the outside where they "squeeze" the rifling in giving it a "smooth" twist. 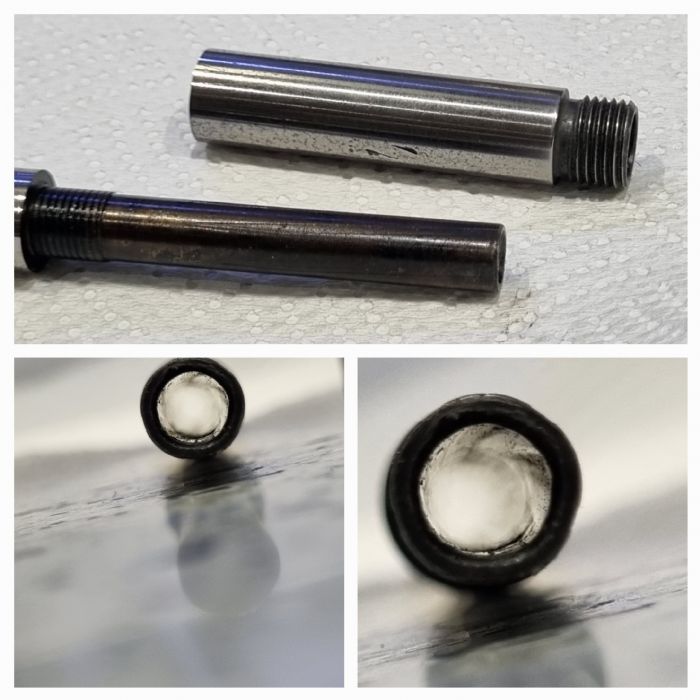 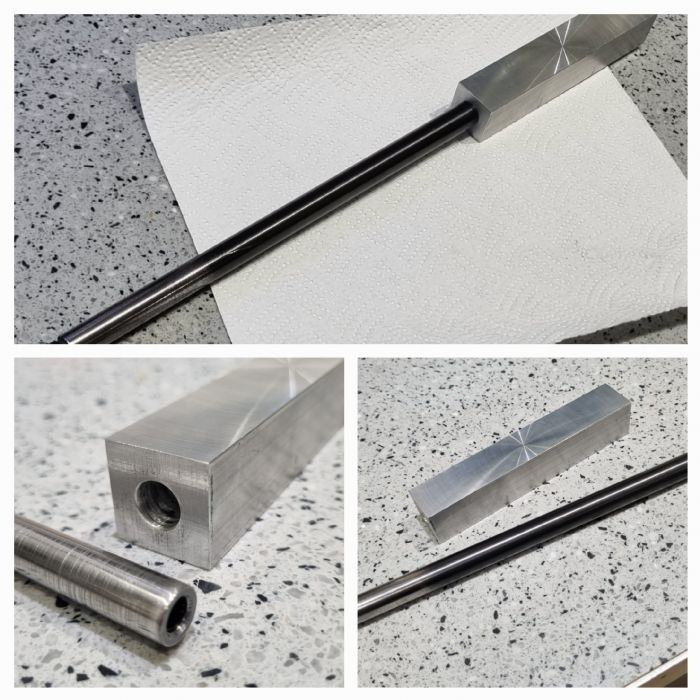 |
Posted By: RangerPete
Date Posted: 20 Sep 2024 at 4:19pm
|
So how long are you planning on making the barrel? ------------- Walk quietly, but carry a big stick. |
Posted By: Pauly5
Date Posted: 20 Sep 2024 at 5:19pm
| Barrel is around 300 mm, so not a small pistol. |
Posted By: J-S
Date Posted: 21 Sep 2024 at 5:39am
|
very cool ------------- https://www.instagram.com/js_airguns/" rel="nofollow - J S Airguns Air Arms TX200('s) Theoben Sirocco HW77 FWB 300s Webley Patriot One or two others... Current projects: Too many.. |
Posted By: Pauly5
Date Posted: 22 Sep 2024 at 5:46pm
|
So i found a piece of brass to use. I have made the poppet valve and loctited it to the stem. After it was fastened I finished off the seat and polished it so the it was concentric with the shaft. I am quite pleased with how it turned out, but of course being pretty doesn't mean it works. I also polished the valve seat. I have some of the 3M polishing cloths, 800 up to 15000 grit. It is satisfying working through them and seeing the finish improve. 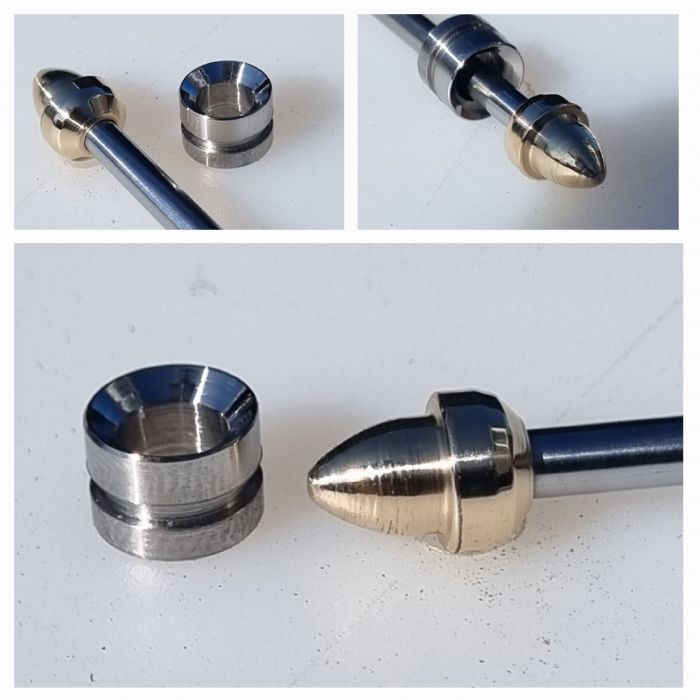 |
Posted By: nunga
Date Posted: 23 Sep 2024 at 2:34am
|
Silly question, You are going to lap the seat in right? That brass looks nice but is it just the picture or are there a lot of machine marks still on the face of that? hope it seals. Nice work! I will get the other brass sent out again for you anyway and you can use it on another project if you dont need it for this now. ------------- 2nd place HP springer - WFTF World Championships 2014 |
Posted By: KiwiTR6
Date Posted: 23 Sep 2024 at 2:36am
|
Paul, I've found Solvol Autosol to be excellent for final polishing. I'm not sure if it would be coarse enough to finalise the metal to metal seal though. I have heard of people using moistened cigarette ash on fuel needle jets, but that's probably finer again. ------------- Daystate Red Wolf .22 FX Dreamline .22 Diana Outlaw .22 HW98 .177 HW30 .177 FWB 124 .177 Diana 35 .177 Diana 340 N-Tec .177 Diana 34 EMS .177 Diana Mod 25 .177 Diana Two Forty .177 Crosman 2240 .22 |
Posted By: Pauly5
Date Posted: 23 Sep 2024 at 2:49am
|
Thanks guys, yes I was going to use something to bed the two together. I have Autosol, valve grinding compound and even toothpaste. Nunga, this is kind of a test run. I don't know how well this will work and so the good thing is that I can take the whole valve system out and replace it, so I will use your piece of brass because it was made for it. It means something to me to use the piece cast especially for it. I can make the mistakes on this first one.
The other thing I was going to do was make the seat out of delrin. |
Posted By: kruzaroad
Date Posted: 23 Sep 2024 at 6:16am
|
It has quite a high polish to it. Think you have to be careful with the pics, one thing I've noticed is they tend to make very miniscule grooves look huge. You can't always believe a pic. |
Posted By: Pauly5
Date Posted: 28 Oct 2024 at 6:56am
I had a good stint in the garage this weekend and have made good and steady progress on this build. I have found that accomplishing one section, then have a cleanup, small break, then onto the next is working well for me. It helps me clear my head for the next part. Not to mention making my wife a coffee and a quick chat too.  So I got the barrel fitted then milled out the loading breech. then drilled and tapped two retaining grub screws for the barrel. Next I chamfered the corners on the top. I'm not totally sure what I am going to do here, but have been toying with keeping it with clean lines and mount a small red dot. I could also fasten a weaver rail to it The result emerged from the aluminium mess.` 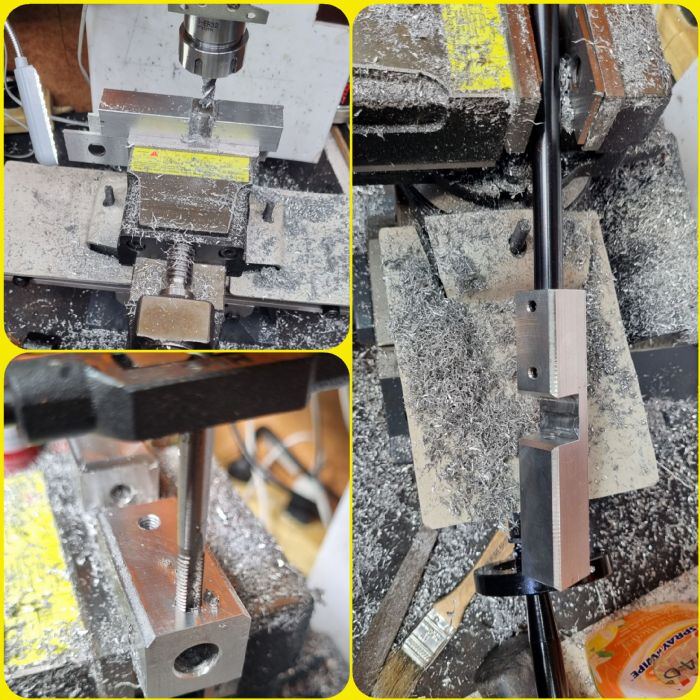 Now that the barrel is fitted I was able to start on the bolt. This turned out really well and confirmed that the barrel and bolt are nicely lined up.Alu had an 8.5mm bore and I reduced the stainless bolt to 8.3 mm at the back and 6.03 mm for the probe part and it slide into place beautifully, so I am very pleased with that. 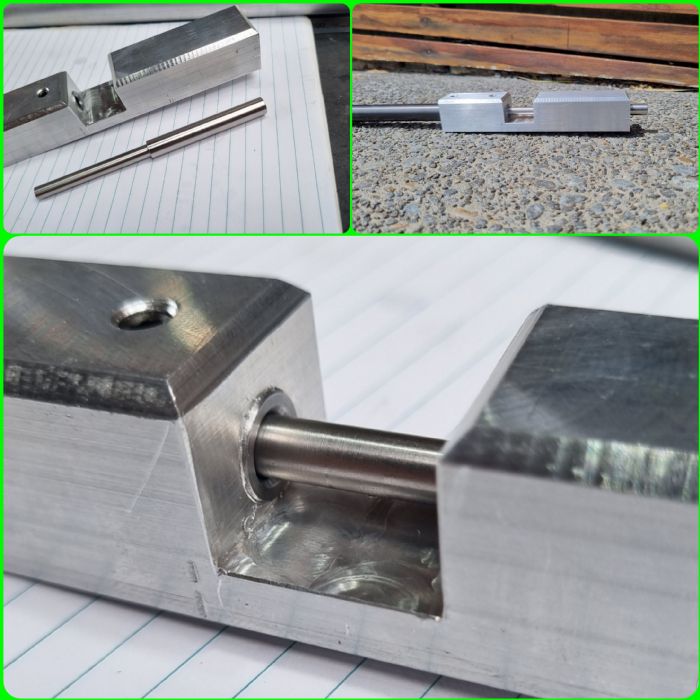 I had also made a preliminary mockup for a fill valve to include a gauge. This is not the final piece, but I know what I want to do. Gauge is mounted into a boss that I plan to have a barrel support fitted to. Fill probe fits nicely underneath it. I just need to get a 10mm x 1.0mm thread tap for the gauge. Also see the finished firing valve body, poppet and seat. They came up really well and I am excitied to see how well it works. Looks good for now anyway. Note the custom Nunga forged brass wrapped in my hori custom made spring.  |
Posted By: RangerPete
Date Posted: 28 Oct 2024 at 8:32am
|
Thats all looking really smart Pauly. Amazing stuff you'r doing there! Im very keen to see how it is all going to come together  ------------- Walk quietly, but carry a big stick. |
Posted By: Pauly5
Date Posted: 29 Oct 2024 at 3:09am
|
Next I contoured the base of the breech to fit onto the 32mm tank. I used a combo of flat end mill and a 32mm wood bit. Unfortunately the wood bit isn't an exact shape with a flat spot making the resulting cut a bit like a flattened dome, so I cut a chanel out with the end mill so there's good contact. I will use a bit of fine sandpaper on a tube to take the sharp edges off the cut later. So you can see what look like corrugations in the cut face. This is probably from my small mill picking up vibrations, but for this purpose it's fine and the light makes it look worse than what it is. 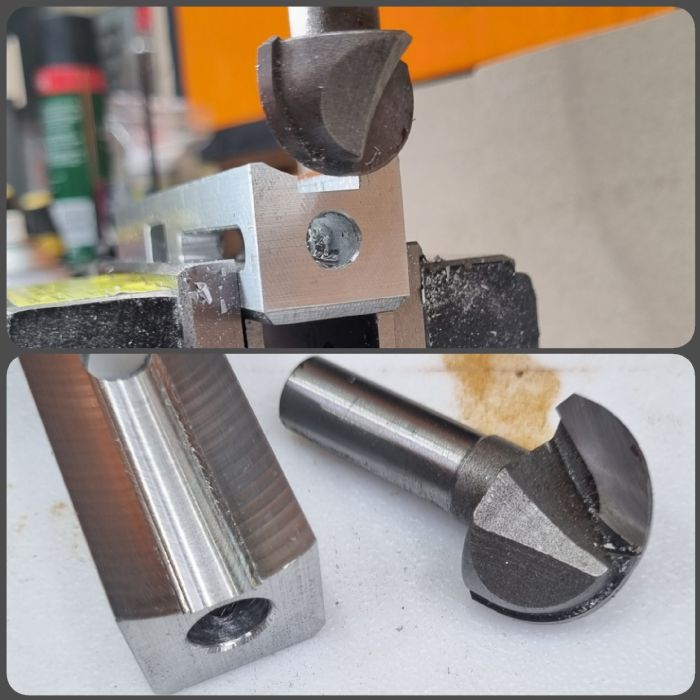 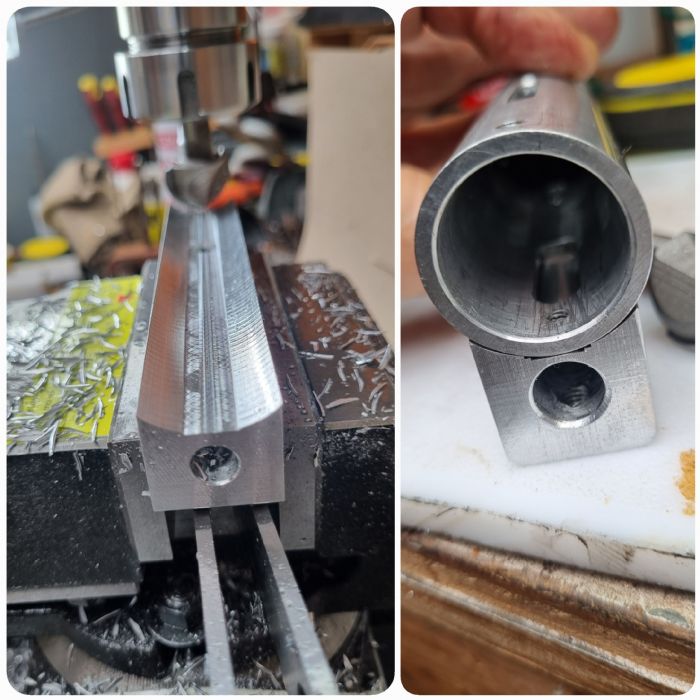 |
Posted By: Pauly5
Date Posted: 19 Nov 2024 at 12:04pm
|
I got myself a proper drill and tap set. Amazing what a difference it makes having the correct drill size, especially when tapping stainless. 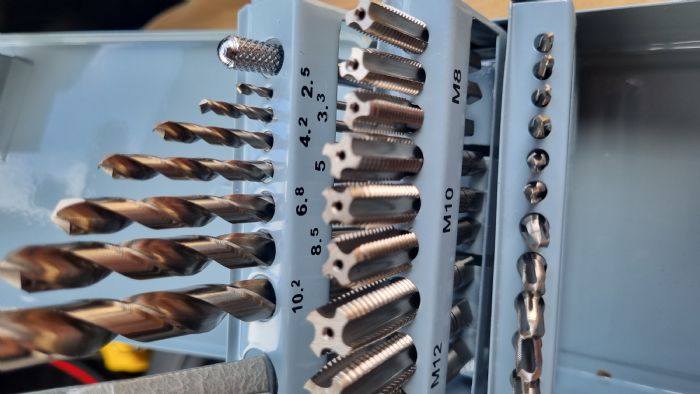
|
Posted By: Pauly5
Date Posted: 19 Nov 2024 at 4:49pm
|
So having said that I have made some more progress on this build. I remade a new fill valve with protection for the gauge. The fill valve is a simple but effective system. I milled off some threads from the screw to let air past and the O ring stops it getting out. 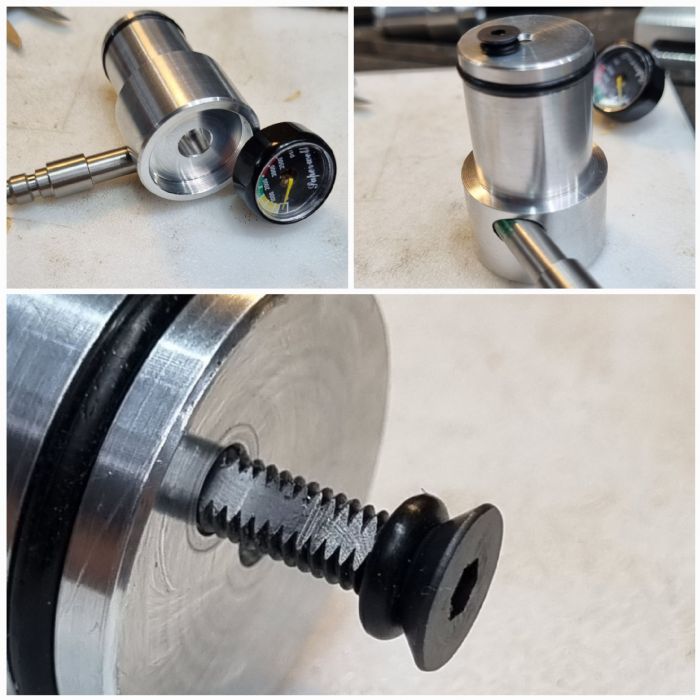 Breech has been drilled and holes tapped to secure it to the tank/body. 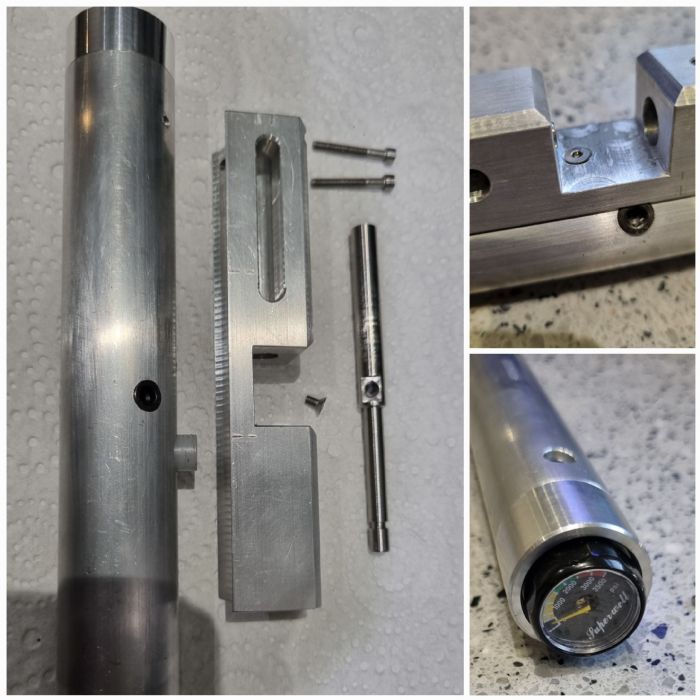 Cap screws sized and retaining holes drilled, tapped and counter bored for them to hold in the fill and main valve body. Basically I took off the knurling so there was an exact fit. 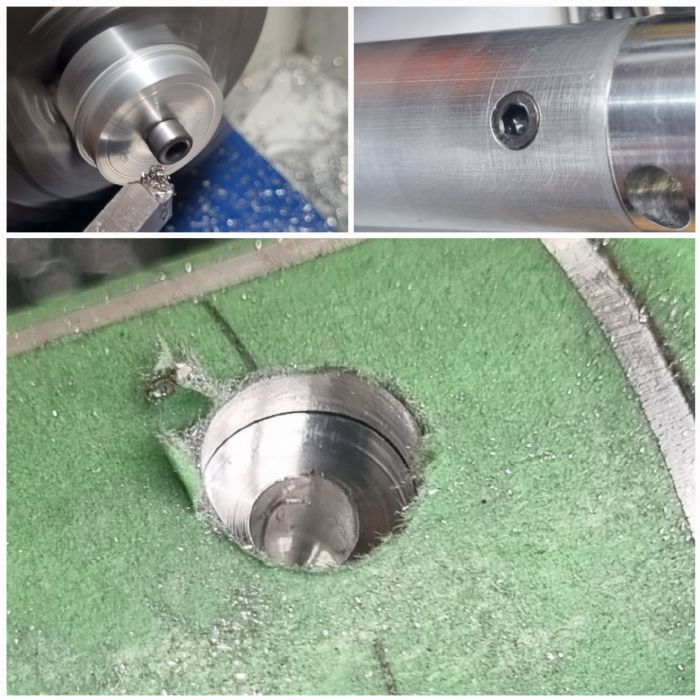 |
Posted By: Pauly5
Date Posted: 19 Nov 2024 at 4:59pm
|
Here you see the stainless probe being tapped. I learnt that with the harder material you need the correct drill bit size. A std drill set has a 4mm drill bit, but it is most likely 3.9 mm, but a 4.2 mm drill bit is required for an M 5 tap. How many taps did I break learning this? New tap set has 3 taps per size. Tapered, intermediate and bottoming. So you need to run all three through to get the final size hole. Fortunately I am enjoying all this learning. The bolt handle will be a straight pull, being retained by a sprung clip. This way you can also close the bolt by the handle, or by pushing bolt with your thumb. Bolt just temporary for now. 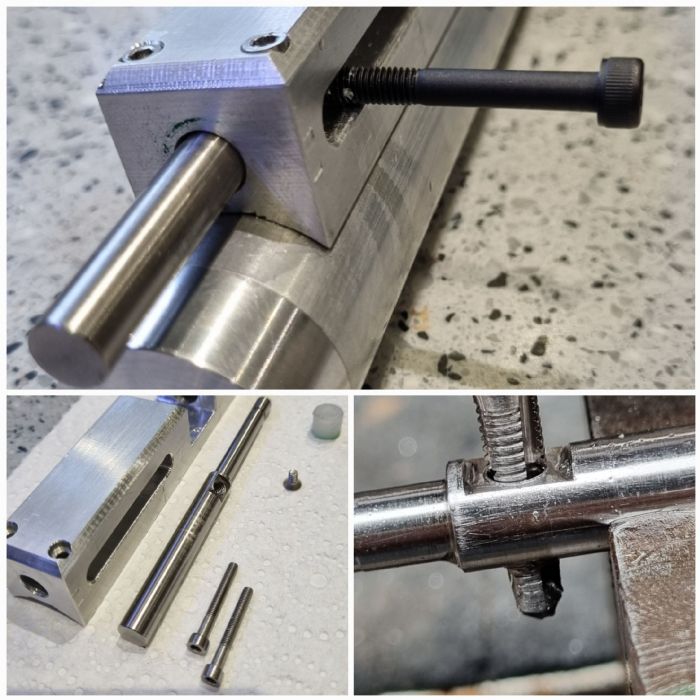 |
Posted By: jwabfrog
Date Posted: 20 Nov 2024 at 2:39am
| Awesome Pauly, I am learning vicariously. It will be super satisfying to shoot knowing you've made the entire thing! |
Posted By: Pauly5
Date Posted: 20 Nov 2024 at 2:58am
|
That's what is motivating me. I mull over something for a few days then go and make it. I plan to feature a bit of nice wood on this too. I have some walnut for it. This is a mockup with a grip I had made ages ago, but I don't really like it. I will put some wood under the tank too. That should hide the industrialousness look of the tank. Excuse the mess. 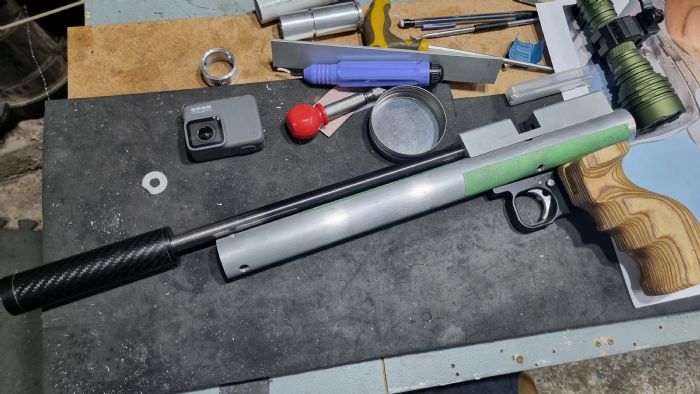 |
Posted By: J-S
Date Posted: 20 Nov 2024 at 4:09am
|
Looks f@#king cool. wish i had the skills! ------------- https://www.instagram.com/js_airguns/" rel="nofollow - J S Airguns Air Arms TX200('s) Theoben Sirocco HW77 FWB 300s Webley Patriot One or two others... Current projects: Too many.. |
Posted By: RangerPete
Date Posted: 20 Nov 2024 at 11:48am
|
Thats really good Pauly ------------- Walk quietly, but carry a big stick. |
Posted By: nunga
Date Posted: 26 Nov 2024 at 9:37am
|
I found this video on youtube, might be of some use. https://www.youtube.com/watch?v=cWCf2Tp1Pic" rel="nofollow - https://www.youtube.com/watch?v=cWCf2Tp1Pic ------------- 2nd place HP springer - WFTF World Championships 2014 |
Posted By: Pauly5
Date Posted: 26 Nov 2024 at 9:42am
|
Thanks Ian, I had actually watched that on Saturday. I would be keep to give the threading a go as opposed to pinning the valves. I am cautious with all that pressure, so until I have seen the correct calculations from a competent person, I wouldn't try it.
|
Posted By: nunga
Date Posted: 26 Nov 2024 at 10:49am
|
yeah you need to be very careful with the threads. Pinning is the safer way to go for sure. 1 psi = 0.070306958 kilogram-force/sq. cm Example: convert 15 psi to kilogram-force/sq. cm: So 3000PSI equals 210.9KG of force. ------------- 2nd place HP springer - WFTF World Championships 2014 |
Posted By: Pauly5
Date Posted: 04 Dec 2024 at 4:18pm
|
Work has been very busy the last couple of weeks, so progress has been slow. I have also had issues drilling and tapping this damn stainless probe. I thought I had it sorted, but I now think I had the drill speed too fast. I also bought myself some decent metal cutting paste too. Anyway, one thing I bought off FB marketplace was a Rotring drawing board for $30. When I was at school I loved Technical drawing and used to have a similar board. I have a few of my parts hand drawn, so now I can draw them to scale. When making the part, I can now concentrate on the making rather than design and turning at the same time. The probe is on it's 3 rd design change now and I am pretty sure this is going to work. I also made the hammer which you can see in the photo. It is made from steel, but has a delrin skirt that is just a touch bigger, so it runs on the delrin. Aluminium is quite a sticky material and the delrin solves the friction between the steel and alu, especially when cocking. In my other pistols I have had to generously lube the tube to overcome this issue. I also started on the grip, doing a trial run using some birch ply glued together. I plan on making the grip from some walnut I have. So I'll update that once I get into it properly. 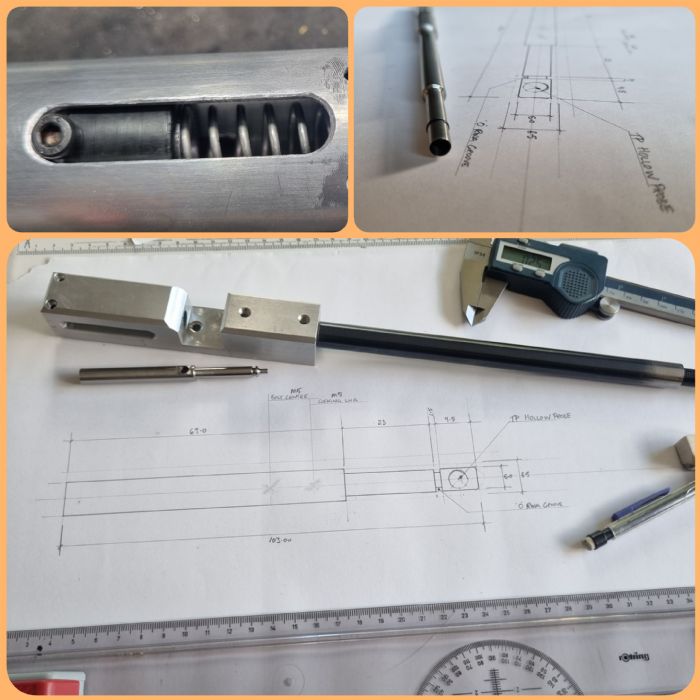 |
Posted By: kruzaroad
Date Posted: 04 Dec 2024 at 4:31pm
|
Probly is to fast pauly. Was watching video a week or so back and dude was having trouble with the drill hardening stainless around holes. Apparently stainless tempers at very low heats. Might have to set up cutting fluid bottle with gravity feed and flow adjustment or something to keep temp down |
Posted By: kruzaroad
Date Posted: 04 Dec 2024 at 4:39pm
|
Just had nosey on web. Starts at around 400° depending on stainless. Recomends a cutting fluid, breaks to let metal cool if drilling to long and this Use a drill bit designed for stainless steel Use a cobalt or titanium nitride (TiN) coated high speed steel (HSS) drill bit with a 135° point. Begin drilling at a lower speed, around 30-60 surface feet per minute (SFM). |
Posted By: Pauly5
Date Posted: 04 Dec 2024 at 5:11pm
|
Thanks Kruz. Yea, I now have a couple of cobalt 4.2 mm bits on the way with the 135 deg point. I was probably spinning the drill at around 1000 rpm, so far too fast. I did a test hole at around 400 rpm and it was day and night. I got RTD metal cutting compound. Its a paste that sticks to the bit as opposed to flooding it.
|
Posted By: kruzaroad
Date Posted: 04 Dec 2024 at 5:19pm
|
Yeah but the flooding pulls heat away from the metal and drill constantly, which im assuming a paste wouldn't, or at least as well. |
Posted By: nunga
Date Posted: 05 Dec 2024 at 8:43am
|
Hard steel equals very slow drill speeds and use thread cutting paste with it. The slower you go the better. High speeds will only burn out your drill bit and work harden the metal even more. Those gold coated so called titanium bits are crap. Only good for soft metals like alloy. ------------- 2nd place HP springer - WFTF World Championships 2014 |
Posted By: Pauly5
Date Posted: 05 Dec 2024 at 9:49am
|
I had a good drill bit, but too much speed. Have got a couple of good 135 deg cobalt bits from Sulco now. Appreciate the help guys.
|
Posted By: Pauly5
Date Posted: 06 Dec 2024 at 4:01am
|
Quick update on drilling. New bits arrived, halved drill speed, used new paste and it cuts like butter. What a relief, I was starting to hate stainless.
|
Posted By: kruzaroad
Date Posted: 06 Dec 2024 at 4:25am
|
Lol. Sweet Pauly. Be a shame to have to use a less durable metal. Looking forward to progress resaults on pistols now you've beaten this problem. |
Posted By: JasonEdward
Date Posted: 06 Dec 2024 at 6:24am
|
Yeah I thought a nice sharp drill was all i needed to drill S/S. Blunted drills, hardened stainless and a fitter mate taught me the error of my ways.  |
Posted By: BC_Clark
Date Posted: 24 Dec 2024 at 2:48pm
|
Looking good Pauly. Pity about the radius cutter not being as advertised. The inlet screw does not really need the flat down the side and it causes more stress on the o-ring to force it around a non-round shape. The air flows past a regular screw anyway but if you must fill faster you can get a similar effect by oversizing the tap drill to 4.5 for M5 and leave the screw standard. When you have stainless parts with a lot of machining time in them and the fastener isn't working close to its capacity, it is advised to use larger tap drills to avoid broken taps. Just adding 0.1mm can go from from walking on ice, to a walk in the park. Anyone not having fun with stainless should try 303 grade for machining. Not only stronger than 304 and 316 but much nicer to machine. |
Posted By: BC_Clark
Date Posted: 24 Dec 2024 at 3:11pm
|
The main thing with drilling stainless is high feed and lower speed. It is not the heat that hardens stainless. Regular 304 and 316 are non heat-hardenable. They only become softer with heat. But they work-harden very readily (316 moreso). So applying too little pressure to the drill causes it to skim along the surface without starting a chip. This work-hardens the surface you're trying to drill. The problem with heat is that it blunts the cutting edge of the drill which leads to work-hardening of the stainless, accelerating the issue. HSS with cobalt can handle higher temperature.
|
Posted By: Pauly5
Date Posted: 26 Dec 2024 at 5:07pm
|
I got a little bit more done today. Enough to fill and fire. I had been having trouble getting the poppet valve to seal. I was trying to get angles to match to no success so opted for a polished flat sealing surface which worked. Here's photo and it's first chrony reading. there's still a lot to do, but it's nice actually firing it now. Just over 15 ft/lb at around 1200 psi in 25 cal. 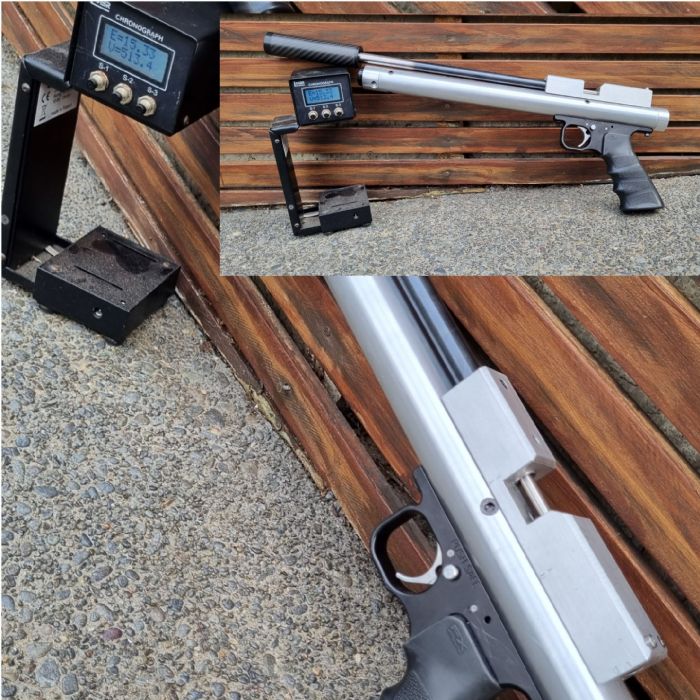 |
Posted By: J-S
Date Posted: 27 Dec 2024 at 3:05pm
|
It’s looking great! Healthy power too ------------- https://www.instagram.com/js_airguns/" rel="nofollow - J S Airguns Air Arms TX200('s) Theoben Sirocco HW77 FWB 300s Webley Patriot One or two others... Current projects: Too many.. |
Posted By: JasonEdward
Date Posted: 28 Dec 2024 at 8:07am
| Nice work - looks great! |
Posted By: Pauly5
Date Posted: 16 Jan 2025 at 1:54pm
|
Hi y'all, I got the lawns done tonight then went into the garage to do a bit more work on the pistol. I had been struggling trying to find a leak. At first I thought it was a line on the inside of the tube from production, so I honed it with 300 grit on a dowel in the lathe. It wasn't this, so I took a serious look at my O ring grooves and I had left a small ridge on the sealing side of it. removing this seems to have done the job. I reassembled the pistol and fired a shot over the chrony, and very interestingly it only read about 4 fpe. I figured this was due to it being too close because the next shot, from further away was better than I expected at a healthy 19.77 fpe. I still have to make the lockup device for the bolt/probe, so I am holding the probe in to fire. On the next shot I got 20.98 fpe. I have learnt that making sure there are no leaks in the transfer port area has a big impact on the power output and you can loose a lot of energy through leaks. I had cut a tapered lead into the barrel and I need to get a slightly thicker probe O ring too as it gets blown out of it's groove, so once I get that and the lock up sorted I am likely to see over 20 fpe for this .25 cal puppy. I don't know how accurate it will be, but I am very happy with the results so far. 26.23 grn pellet @ 600 fps  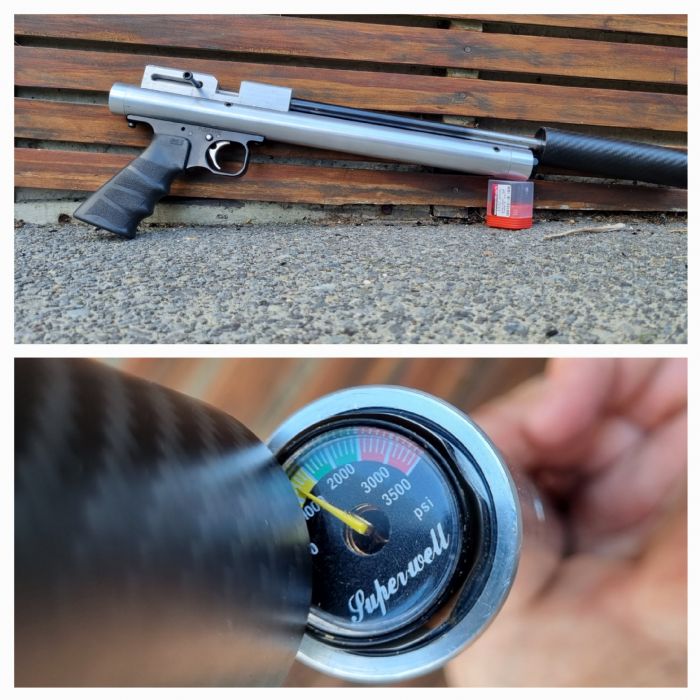 |
Posted By: Pauly5
Date Posted: 09 Feb 2025 at 1:47pm
|
First bit of progress here for a while. I have made a start on what I call the cocking plate. This is part of the bolt lockup very similar to what I have done on another build. Bolt will be straight pull, but be spring loaded and will lock into and locate into place being held captive when loaded. It just a piece of mild steel, but I squared it up in the mill and countersunk the 4 screws that will hold it in place. 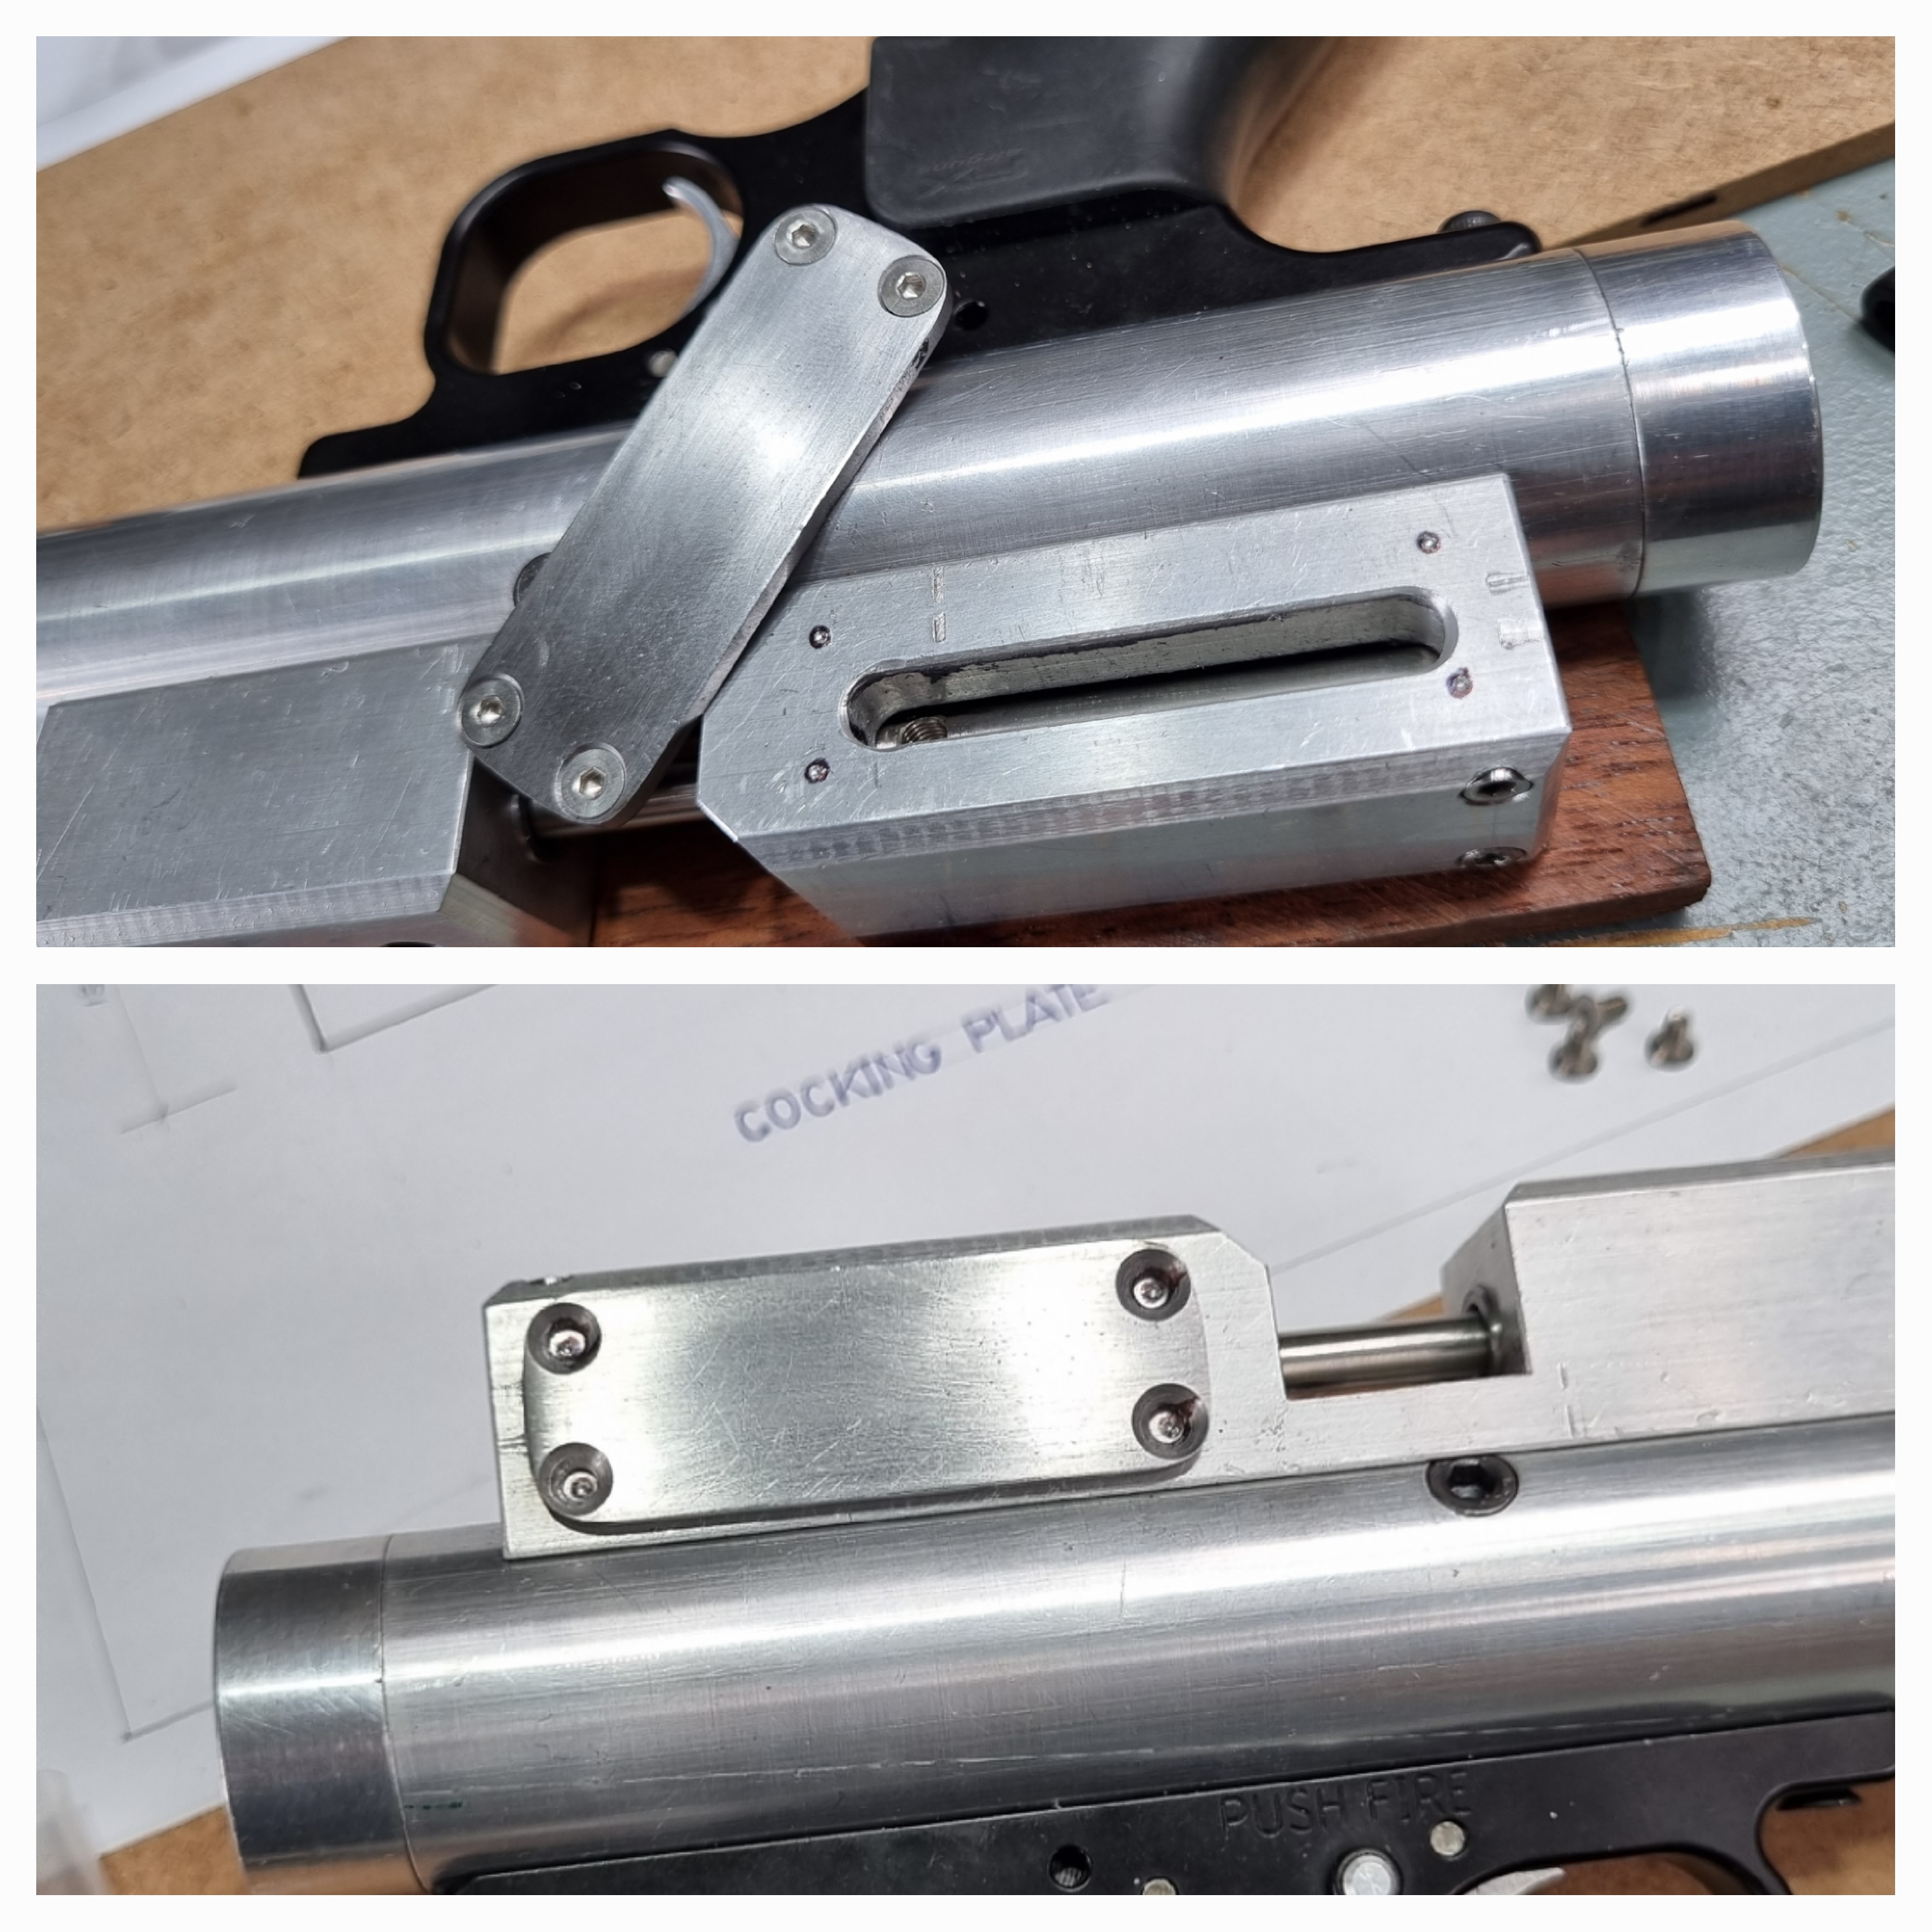 |
Posted By: RangerPete
Date Posted: 09 Feb 2025 at 2:14pm
|
Looking good, cant wait to see it when its all finished. ------------- Walk quietly, but carry a big stick. |
Posted By: Pauly5
Date Posted: 11 Mar 2025 at 9:06pm
|
very firable now. I have completed the cocking lockup mechanism now and it's shooting really well. I fired about 6 shots over the chrony and got a fairly consistant 21 - 22 fpe from a 26 grn pellet. Next I am looking for a compact red dot/holograph sight for it. I won't make rails, but will attach the sight directly to the breech. Here's a link to a short video. https://youtube.com/shorts/naeNdHIvOVo?si=UgD87Ts6zoEL3e7s
|
Posted By: jwabfrog
Date Posted: 12 Mar 2025 at 11:42am
| Very cool Paul, you are a talented engineer! |
Posted By: J-S
Date Posted: 12 Mar 2025 at 12:24pm
|
That’s awesome. ------------- https://www.instagram.com/js_airguns/" rel="nofollow - J S Airguns Air Arms TX200('s) Theoben Sirocco HW77 FWB 300s Webley Patriot One or two others... Current projects: Too many.. |
Posted By: Pauly5
Date Posted: 29 Jun 2025 at 11:27pm
|
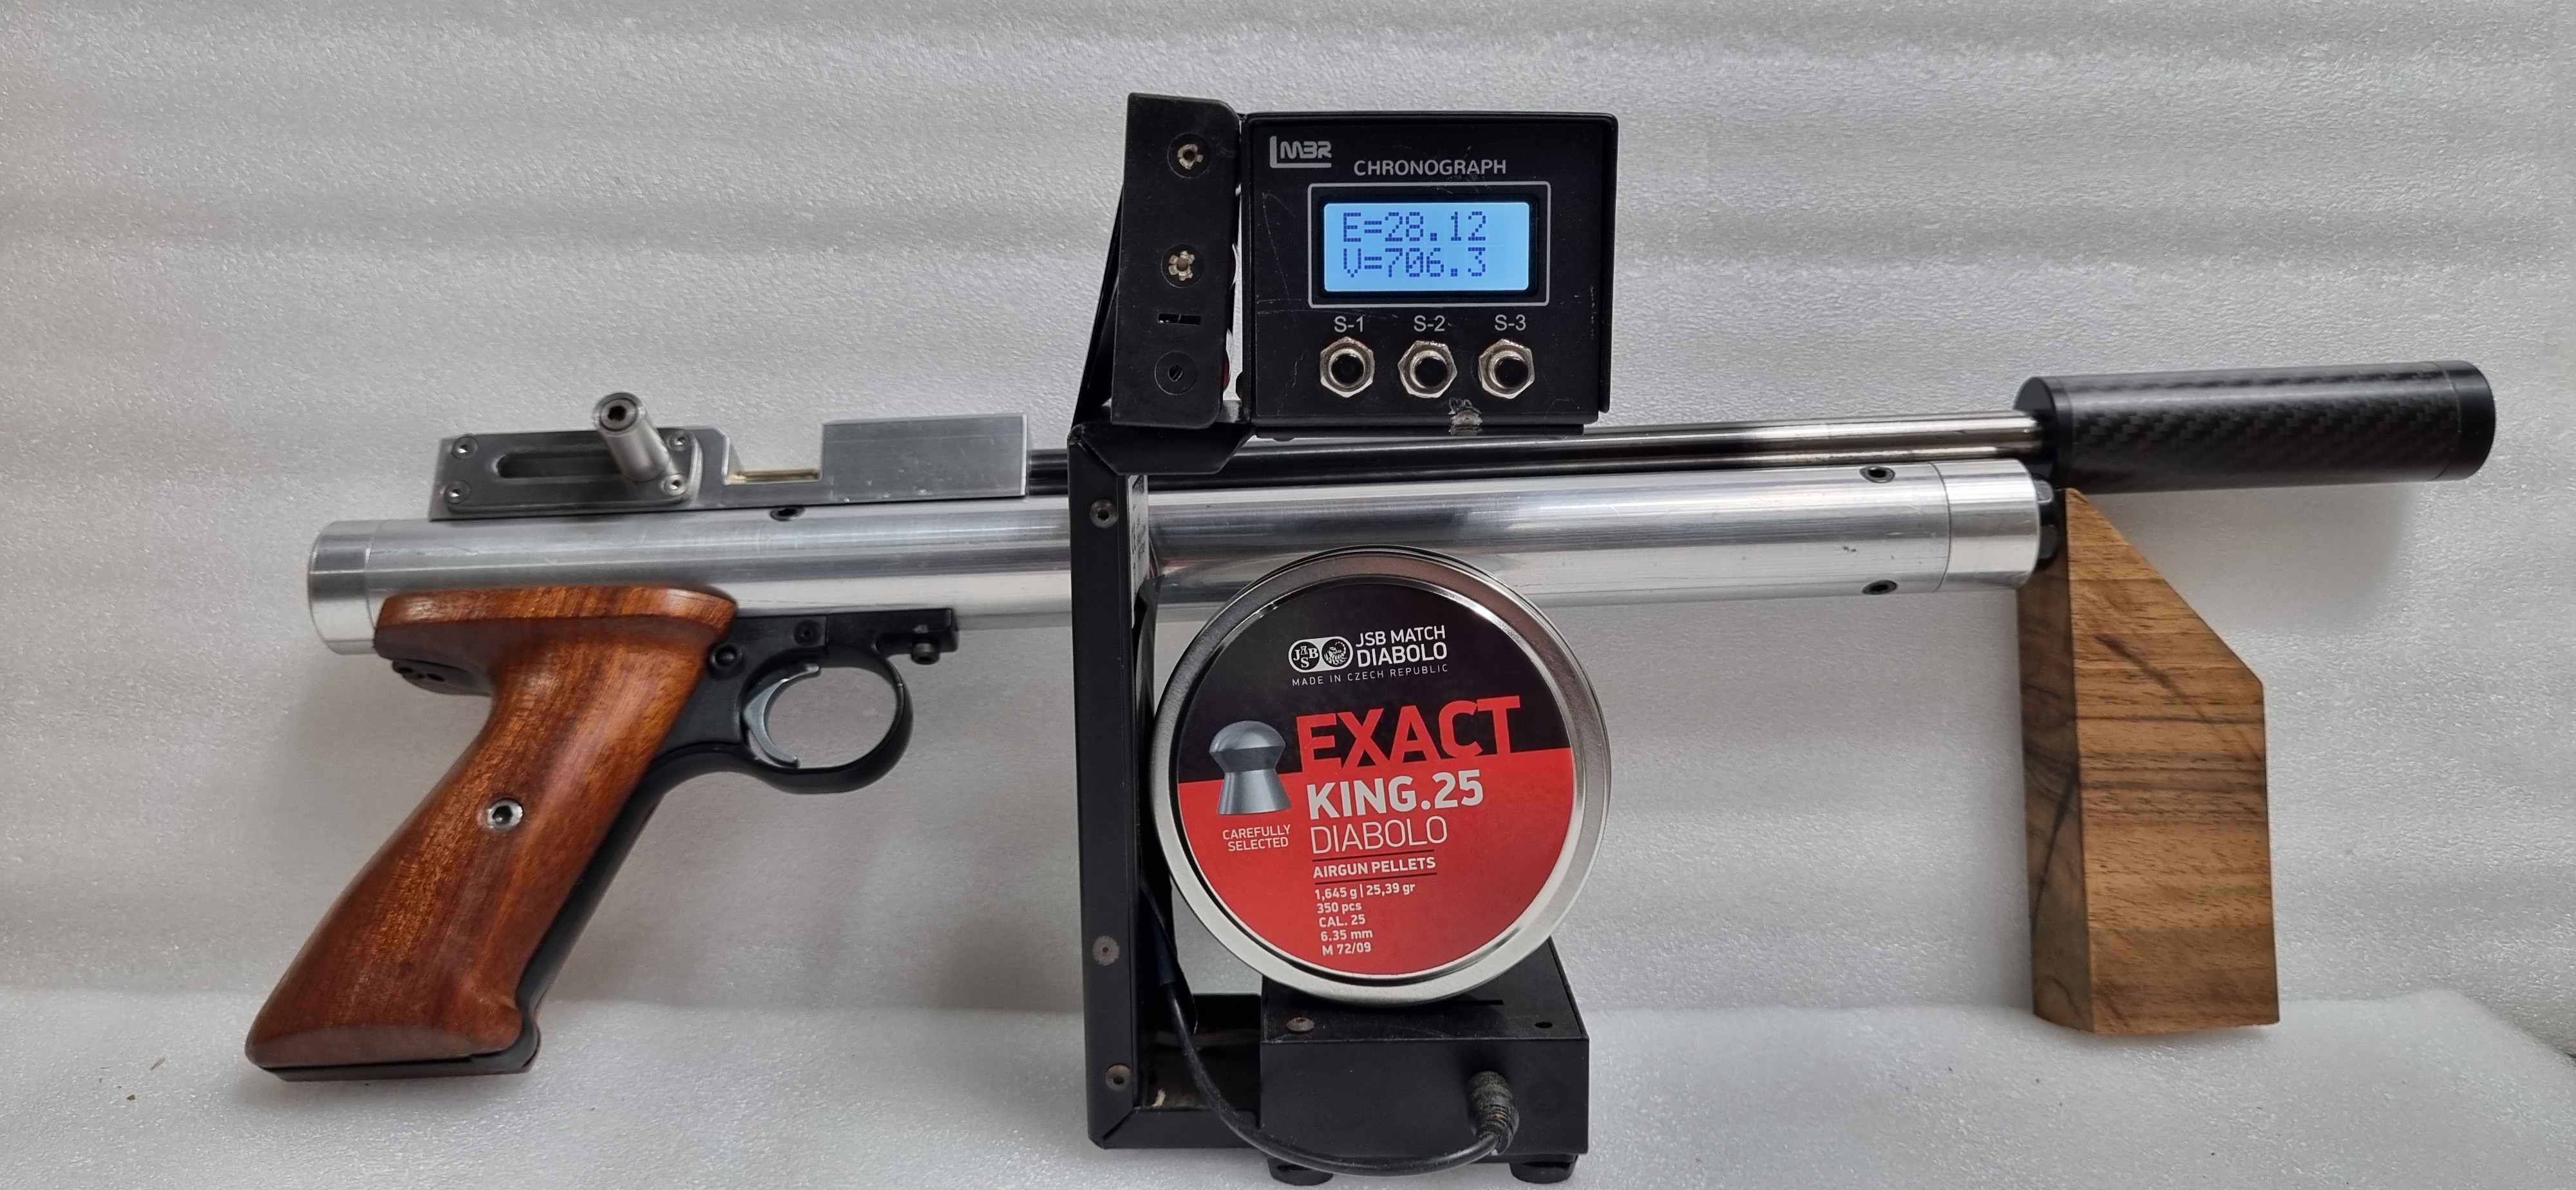
I have been chipping away on this pistol and I am pretty close to completion. I have tried making 3D printed cosmetic additions, but they aren't quite right. Of course I would show photo's, but don't know if we have that sorted yet. But, I did beef up the hammer length by adding an adjustable striking surface. I filled it to around 1500 psi and it pushed a 25 grn pellet at 706 fps, which equates to just over 28 ft/lb. I don't think I will get many usable shots at that, but I am really pleased with that as a result, as it means I have made the valve breath well enough to do that. I have a small red dot to mount on it now and accuracy testing to come next. I will load photos when I can.
|
Posted By: RangerPete
Date Posted: 30 Jun 2025 at 5:22pm
|
Exciting progress, keep us posted. ------------- Walk quietly, but carry a big stick. |
Posted By: Pauly5
Date Posted: 10 Jul 2025 at 9:35pm
| https://imgur.com/a/JpHT1RM" rel="nofollow - https://imgur.com/a/JpHT1RM |
Posted By: Pauly5
Date Posted: 10 Jul 2025 at 9:41pm
| I have tried uploading this photo following Grey Kiwi's workaround. |
Posted By: Pauly5
Date Posted: 09 Oct 2025 at 7:26am
|
Now we can post photos again I have a more recent photo of my 25 cal pistol build. It's pretty much finished, holding air and lobbing those big pellets. I still have to see how accurate it is, but at around 12 m it grouped well without trying too hard. 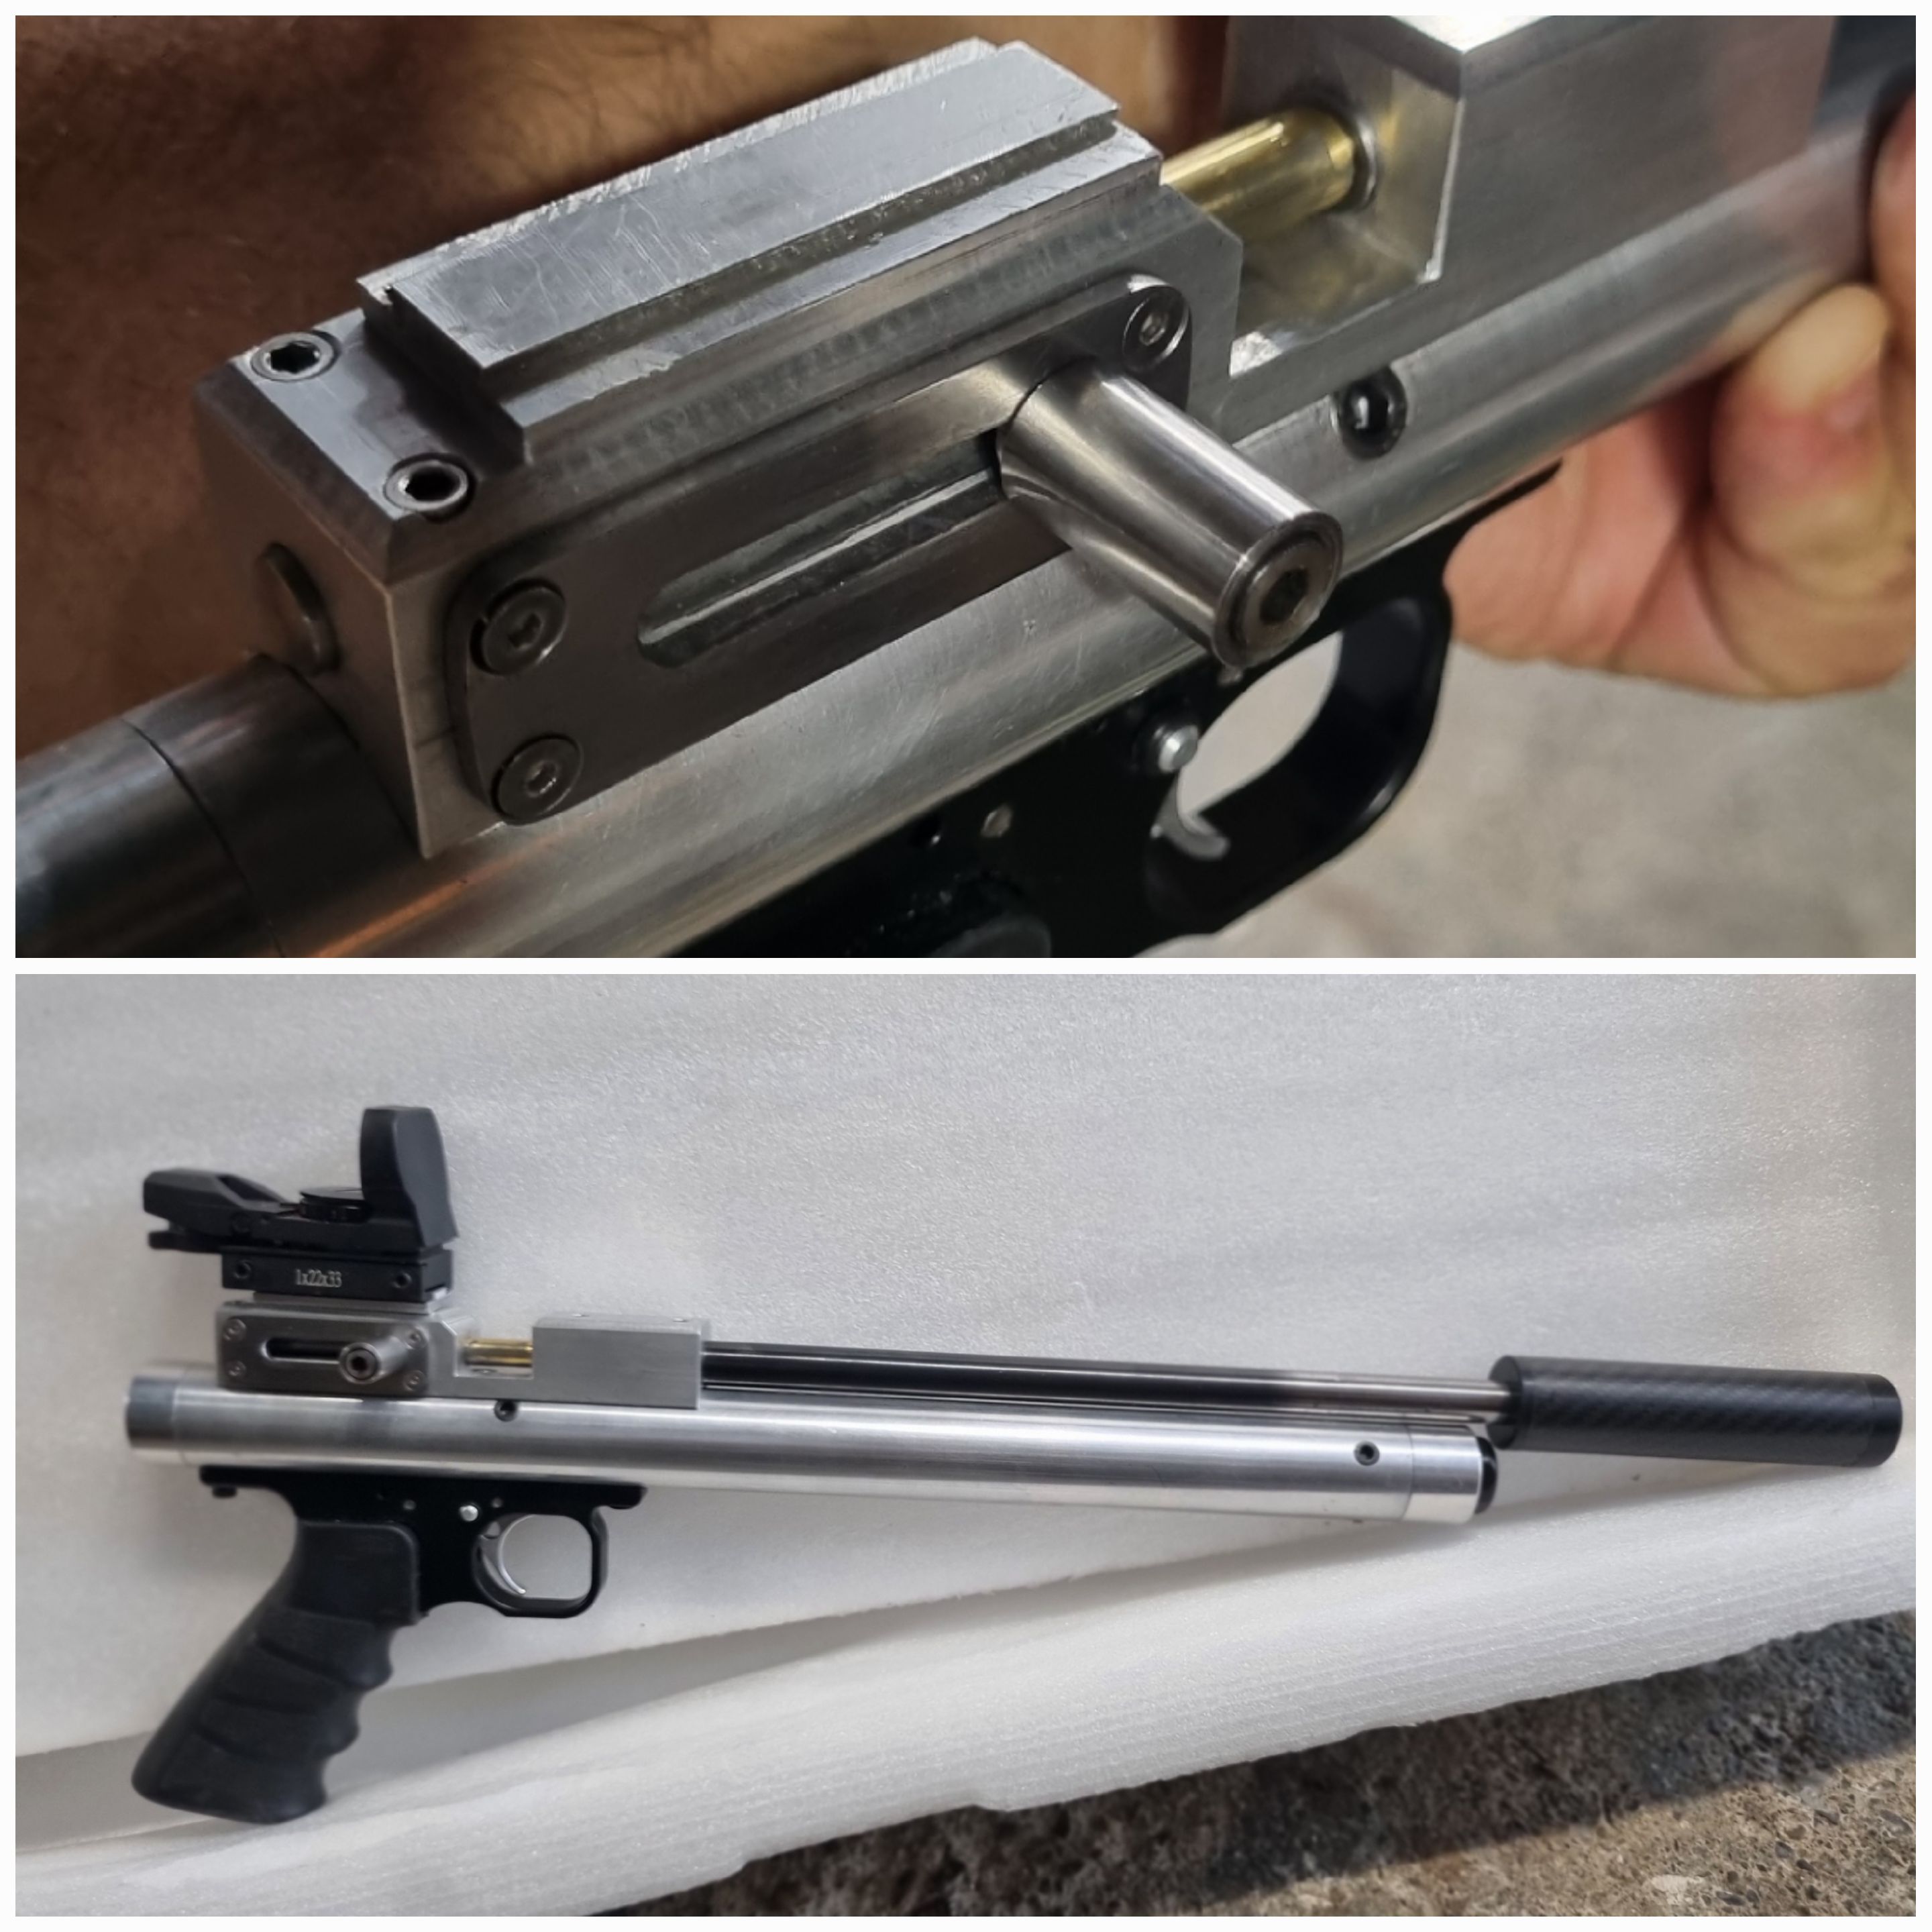
|
Posted By: kruzaroad
Date Posted: 09 Oct 2025 at 7:45am
|
I like that. That breech how heavy is it? I rather like the ability to access it and if that dove tail plate is removable? That allows the possibility of bolt on picatiny, weaver, special made plates for say a ghost ring,peep sights etc. Why dont you band the barrel? Is the barrel pretty thick? Me personally find the band on crosman helps with accuracy, when i tried it off it widened the group a good inch. Its a nice looking pistol paul. I like the rawness of the build. Looks practical and accessable,solid. Got any plans for wood or color? |
Posted By: Pauly5
Date Posted: 09 Oct 2025 at 9:09am
|
Yes, wood is involved. I just found a more recent photo with power it's achieving.
|
Posted By: Pauly5
Date Posted: 09 Oct 2025 at 9:12am
 |
Posted By: kruzaroad
Date Posted: 09 Oct 2025 at 10:26am
|
That holds energy down range for quite a while. Even with a shorter barrel im guessing it will have effective range. Goats not out of question either. Nice Wood adds to it nicely. You must be pretty stoked 👍 |
Posted By: Pauly5
Date Posted: 09 Oct 2025 at 5:33pm
| Thanks Kruz, I get enjoyment from firing it. I'd love to try it on rabbits, but need more practice with a pistol. I coulkd put the stock on it maybe. |
Posted By: kruzaroad
Date Posted: 10 Oct 2025 at 6:47am
|
A stock is going to give you a a better performance evaluation of the gun just on stability alone. Do preformance with a stock for evaluation of gun then put back to pistol and test. Is the dove tail removable? |
Posted By: Pauly5
Date Posted: 10 Oct 2025 at 7:32am
| yes. ive mounted the red dot directly. i made the dove tail plate, but didnt use it. |
Posted By: nunga
Date Posted: 28 Mar 2026 at 6:56pm
|
I know this is an old post now but what pressure did you have it fulled up to for those last numbers? ------------- 2nd place HP springer - WFTF World Championships 2014 |
Posted By: Pauly5
Date Posted: 29 Mar 2026 at 8:05am
|
It would have been around 1800 - 2000 psi |