The $100 challenge..... |
Post Reply 
|
Page <1 678910 23> |
| Author | |
KiwiTR6 
Senior Member 

Joined: 04 Nov 2022 Location: North Island Status: Offline Posts: 447 |
 Post Options Post Options
") Thanks(0) Thanks(0)
 Quote Reply Quote Reply
 Posted: 27 Aug 2023 at 3:45pm Posted: 27 Aug 2023 at 3:45pm |
 Really enjoying this and worth every cent of the paltry sum I paid for the gun. I'm new to the sport and this is a great way to learn more in a relatively short time with not a lot at stake.... Really enjoying this and worth every cent of the paltry sum I paid for the gun. I'm new to the sport and this is a great way to learn more in a relatively short time with not a lot at stake....Edited by KiwiTR6 - 27 Aug 2023 at 3:45pm |
|
|
Daystate Red Wolf .22
FX Dreamline .22 Diana Outlaw .22 HW98 .177 HW30 .177 FWB 124 .177 Diana 35 .177 Diana 340 N-Tec .177 Diana 34 EMS .177 Diana Mod 25 .177 Diana Two Forty .177 Crosman 2240 .22 |
|
 |
|
|
kruzaroad
Senior Member

Joined: 03 Jul 2022 Location: Hastings 4 now Status: Online Posts: 2988 |
Post Options
Thanks(0)
Quote Reply
Posted: 27 Aug 2023 at 4:03pm |
Hmmm a pitch fork that might work, it certainly won't be these guns. If we did standing still would be the safest way to avoid pellets
|
|
|
|
|
Pauly5
Forum Moderator 
Joined: 11 Mar 2013 Location: Titahi Bay Status: Offline Posts: 1741 |
Post Options
Thanks(0)
Quote Reply
Posted: 27 Aug 2023 at 4:12pm |
LOL, what we are going to do is stand you in front of a wall execution style, and use our Air Chiefs to take shots at you....so you're safe.
|
|
|
|
|
Billbobnz
Senior Member

Joined: 14 Jun 2020 Location: Ashburton Status: Offline Posts: 938 |
Post Options
Thanks(0)
Quote Reply
Posted: 27 Aug 2023 at 4:16pm |
|
Hahahahaha yes the pitchforks are definitely a scarier thought than the air chiefs
I wonder after a couple of months of tinkering we take them back to GC and say they didn't work! Haha |
|
|
|
|
kruzaroad
Senior Member
Joined: 03 Jul 2022 Location: Hastings 4 now Status: Online Posts: 2988 |
Post Options
Thanks(0)
Quote Reply
Posted: 28 Aug 2023 at 2:01am |
|
More like take it back after couple of months say it does work and that's not good enough as it will no longer discourage kids from shooting as it now hits the target.
|
|
|
|
|
KiwiTR6
Senior Member
Joined: 04 Nov 2022 Location: North Island Status: Offline Posts: 447 |
Post Options
Thanks(0)
Quote Reply
Posted: 28 Aug 2023 at 2:34am |
|
Gave my issue some serious thought last night and I'm pretty sure I know whats going on. I won't detail my theory at this stage, instead I'll reassemble the gun and carry out some testing to see if I'm on the right track
 Edited by KiwiTR6 - 28 Aug 2023 at 2:35am |
|
|
Daystate Red Wolf .22
FX Dreamline .22 Diana Outlaw .22 HW98 .177 HW30 .177 FWB 124 .177 Diana 35 .177 Diana 340 N-Tec .177 Diana 34 EMS .177 Diana Mod 25 .177 Diana Two Forty .177 Crosman 2240 .22 |
|
|
|
|
kruzaroad
Senior Member
Joined: 03 Jul 2022 Location: Hastings 4 now Status: Online Posts: 2988 |
Post Options
Thanks(0)
Quote Reply
Posted: 28 Aug 2023 at 2:52am |
|
Nah detail the theory!
Be interested in results. If we put up alterations as we do it and theories, someone may combine a few and come up with a winning combination. Which I suspect will invoke a lathe a milling machine, a hammer and lots of swearing. |
|
|
|
|
RangerPete
Senior Member
Joined: 19 Apr 2023 Location: Cambridge. Status: Offline Posts: 1102 |
Post Options
Thanks(0)
Quote Reply
Posted: 28 Aug 2023 at 4:04am |
|
@Kiwi… u going to use the stock to straighten out the tube…? 🤔 that’s what I’d do… 😂😂😂
|
|
|
Walk quietly, but carry a big stick.
|
|
|
|
|
kruzaroad
Senior Member
Joined: 03 Jul 2022 Location: Hastings 4 now Status: Online Posts: 2988 |
Post Options
Thanks(0)
Quote Reply
Posted: 28 Aug 2023 at 4:30am |
|
Good point Pete. I know when I looked at my stock I had 3points of rubbing (none which I've taken care of yet.)
All at rear of reciever, which I wondered at the time if it was holding the cylinder above the vast majority of the ribs on stock. Wouldn't surprise me if bad fit to stock is part of the issue with them. |
|
|
|
|
KiwiTR6
Senior Member
Joined: 04 Nov 2022 Location: North Island Status: Offline Posts: 447 |
Post Options
Thanks(0)
Quote Reply
Posted: 28 Aug 2023 at 4:43am |
|
OK guys, this is what I think could be my problem. Nothing to do with the banana cylinder, but I will straighten that in due course with my little hydraulic press and wooden blocks with cutouts to match the OD. 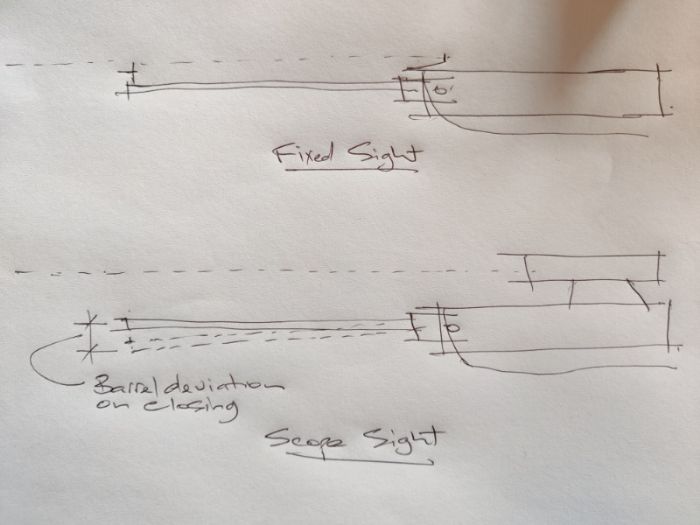 With the factory fixed sights the shooting line is correct (despite it masking the target) regardless of the barrel location, hence the reasonable groupings I was achieving when I started. However, the scope is fixed to the cylinder and I think the slack in the pivot and possibly other factors means the barrel is not locking into the same position each time the gun is loaded, hence the inability to achieve grouping of any sort. I imagine the deviation is both vertical and lateral. My plan is to fit an adapter rail onto the barrel where the rear sight normally locates. There's only two fairly shallow 4mm threaded holes to work with but they should be enough for a trial at least. To that I'll connect the Hawke red dot off the wife's Cometa and see If I can get it to group again. The red dot will work as it's visible with a huge range of eye relief. I wouldn't be able to do it with anything else other than a more refined fixed sight setup. If this proves my point, then some serious work is going be needed to ensure the barrel locks in place true and consistent every time in order to continue with a normal scope setup. I hope to be able to post some results in the next day or so.
Edited by KiwiTR6 - 28 Aug 2023 at 4:44am |
|
|
Daystate Red Wolf .22
FX Dreamline .22 Diana Outlaw .22 HW98 .177 HW30 .177 FWB 124 .177 Diana 35 .177 Diana 340 N-Tec .177 Diana 34 EMS .177 Diana Mod 25 .177 Diana Two Forty .177 Crosman 2240 .22 |
|
|
|
|
kruzaroad
Senior Member
Joined: 03 Jul 2022 Location: Hastings 4 now Status: Online Posts: 2988 |
Post Options
Thanks(0)
Quote Reply
Posted: 28 Aug 2023 at 5:11am |
|
Sounds very likely. So do you think if the locking pin for the barrel was thickened or some sort of shim that it would hold the barrel steadier vertically.
|
|
|
|
|
KiwiTR6
Senior Member
Joined: 04 Nov 2022 Location: North Island Status: Offline Posts: 447 |
Post Options
Thanks(0)
Quote Reply
Posted: 28 Aug 2023 at 6:29am |
|
I can see a couple of issues other than the pivot. I've got some shims so once I've taken it apart I'll look at the pivot as well, but the latching mechanism isn't particularly positive and the breech seal protrudes and is so firm that it also affects the alignment when loaded. I'm fairly close to getting the scope mounted, just a couple of mods needed to the mounting bracket to allow the barrel to pivot fully and cock. Should be able to produce some test results today some time.
|
|
|
Daystate Red Wolf .22
FX Dreamline .22 Diana Outlaw .22 HW98 .177 HW30 .177 FWB 124 .177 Diana 35 .177 Diana 340 N-Tec .177 Diana 34 EMS .177 Diana Mod 25 .177 Diana Two Forty .177 Crosman 2240 .22 |
|
|
|
|
KiwiTR6
Senior Member
Joined: 04 Nov 2022 Location: North Island Status: Offline Posts: 447 |
Post Options
Thanks(0)
Quote Reply
Posted: 28 Aug 2023 at 9:19am |
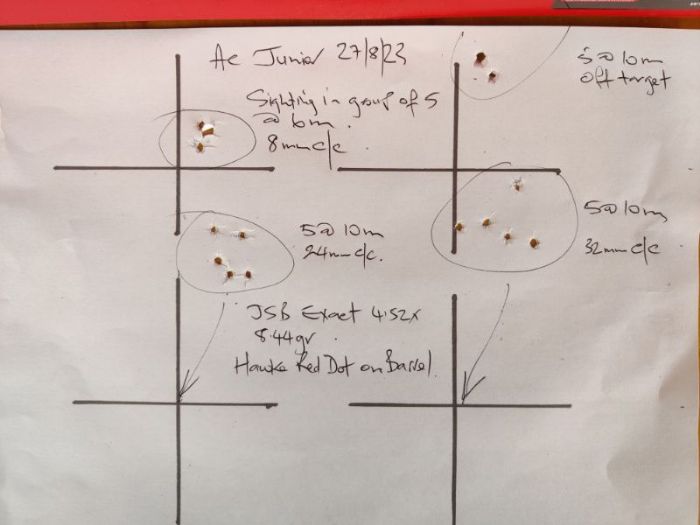 A definite improvement on what I was getting yesterday! I'm strugglinfg to make sense of the adjusters on the red dot, but the groups are OK I think. The trigger is aweful, sometimes I can feel an initial set and it fires with a little more pressure, other times no set and a lot of pressure required and it fires unexpectedly. I've included some photos of the modified picatinny adapter I used and the cutouts I had to add to allow clearance for the barrel. 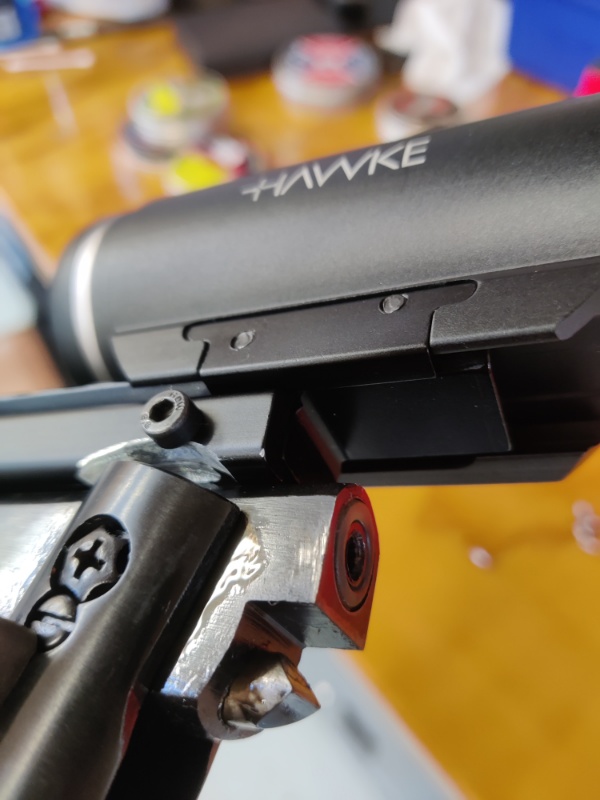 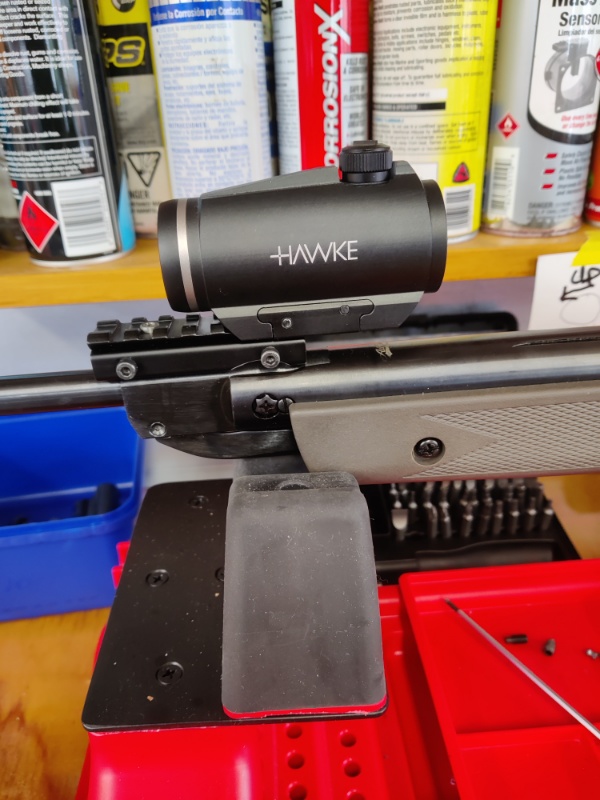 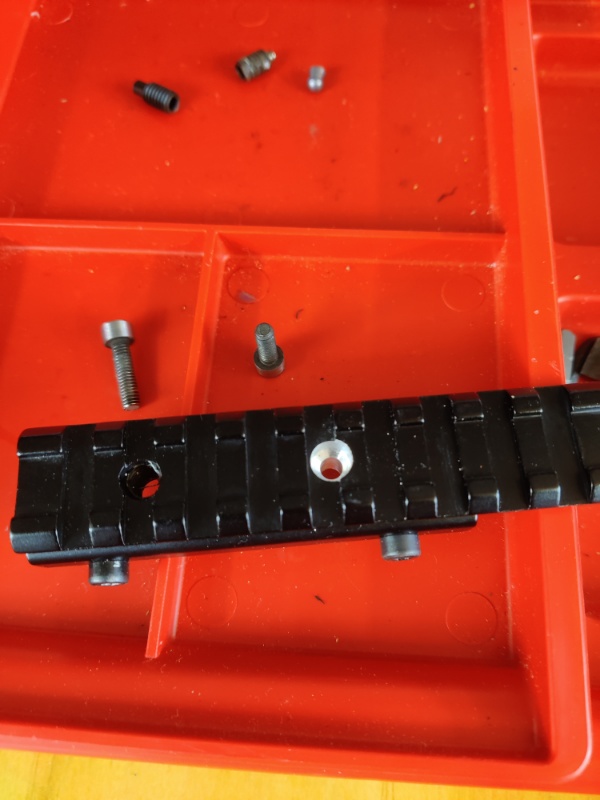 |
|
|
Daystate Red Wolf .22
FX Dreamline .22 Diana Outlaw .22 HW98 .177 HW30 .177 FWB 124 .177 Diana 35 .177 Diana 340 N-Tec .177 Diana 34 EMS .177 Diana Mod 25 .177 Diana Two Forty .177 Crosman 2240 .22 |
|
|
|
|
mercs
Senior Member

Joined: 25 Apr 2020 Location: Stratford Status: Offline Posts: 366 |
Post Options
Thanks(0)
Quote Reply
Posted: 28 Aug 2023 at 10:15am |
|
Thats cool, many many rifles around the world could have done with that solution over the years. They are a great adaptor rail and mine has also been taken to with hacksaw and file for different projects.
The pivot and effective detent mechanism is always worth attention on a new break barrel and normally an immediate warranty return if any doubts. My Nikko Stirling red dot vertical adjustment is normal but windage is the opposite to the markings which I removed to prevent confusion. Great stuff
|
|
|
|
|
mercs
Senior Member
Joined: 25 Apr 2020 Location: Stratford Status: Offline Posts: 366 |
Post Options
Thanks(0)
Quote Reply
Posted: 28 Aug 2023 at 10:29am |
|
What to compare the AC Junior against.
I have chosen Crosman Raven ($199) genuinely a youth rifle because it said so on the box. Bought out into the light from the back of the gun safe and Gamo 4x32 scope fitted to be consistent.  I feel this is a much nicer rifle to shoot and was very surprised with the resulting 35mm OD group same as the AC Junior. Standing is not my position of choice so I repeated the test and got a 40mm OD for my trouble. On that my AC junior may actually stack up as a low cost youth rifle, except for the bloody trigger. I could shoot the Crosman all day, but the AC just plain hurts, so trigger is next point of interest for me. 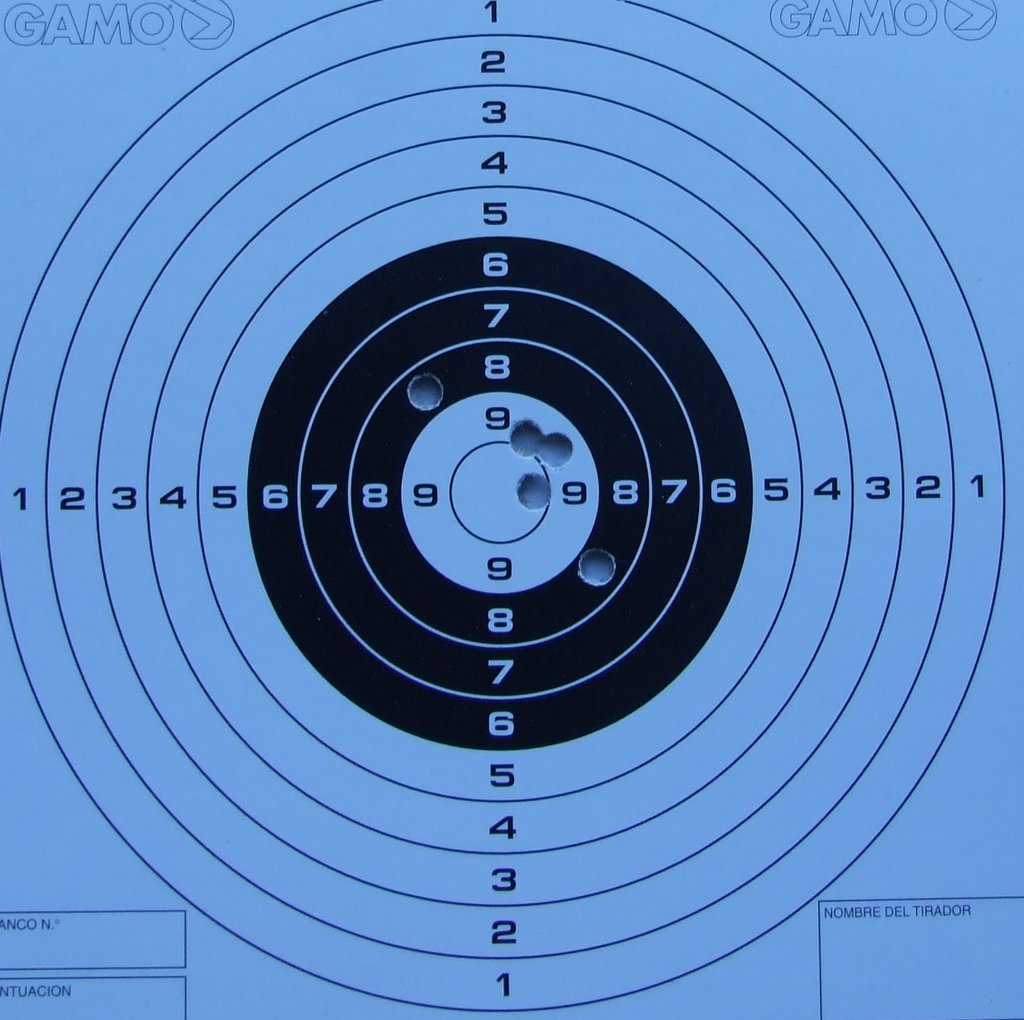 |
|
|
|
|
Post Reply
|
Page <1 678910 23> |
 Tweet
Tweet
|
| Forum Jump | Forum Permissions You cannot post new topics in this forum You cannot reply to topics in this forum You cannot delete your posts in this forum You cannot edit your posts in this forum You cannot create polls in this forum You cannot vote in polls in this forum |


 Topic Options
 Billbobnz wrote: