The $100 challenge..... |
Post Reply 
|
Page <1 1112131415 23> |
| Author | |
KiwiTR6 
Senior Member 

Joined: 04 Nov 2022 Location: North Island Status: Offline Posts: 447 |
 Post Options Post Options
") Thanks(0) Thanks(0)
 Quote Reply Quote Reply
 Posted: 07 Sep 2023 at 3:09pm Posted: 07 Sep 2023 at 3:09pm |
|
Mine will be a present to the grandson in a few years when he's old enough
 |
|
|
Daystate Red Wolf .22
FX Dreamline .22 Diana Outlaw .22 HW98 .177 HW30 .177 FWB 124 .177 Diana 35 .177 Diana 340 N-Tec .177 Diana 34 EMS .177 Diana Mod 25 .177 Diana Two Forty .177 Crosman 2240 .22 |
|
 |
|
|
kruzaroad
Senior Member

Joined: 03 Jul 2022 Location: Hastings 4 now Status: Online Posts: 2988 |
Post Options
Thanks(0)
Quote Reply
Posted: 07 Sep 2023 at 3:35pm |
|
If mine don't improve after a bit of work best thing I can think to do with it is, cut it half length ways and hang it on the wall.
Maybe sell both halves as a demo cut away for $150.00 each. All. Polished of course. |
|
|
|
|
RangerPete
Senior Member
Joined: 19 Apr 2023 Location: Cambridge. Status: Offline Posts: 1102 |
Post Options
Thanks(0)
Quote Reply
Posted: 07 Sep 2023 at 5:12pm |
|
I bought a second hand killwell 4x32 scope from Youngs in Auckland which I have put on the black mamba, but I think this scope is f****d… since putting it on the 10m groups have gotten worse 😳
The left/Right adjusting dial on the side of the saddle was loose, the cover popped off to expose 3 tiny screws which were all loose, so I tightened them up. The gamo one piece rail/rings has moved back about 5mm in the dove tail, but there is no “recoil lug” hole in the top of the cylinder, so I’m not sure how I’m going to keep the rail from moving backwards. Might have to drill a hole somewhere??? How thick is the cylinder, and are there any vital internal parts I should try and avoid drilling through? 😂 Pauly, thanks for the offer of some Molly. Is it something I can get from mite 10? If not then I’d definatly like to take you up on ur offer of posting some to me please. |
|
|
Walk quietly, but carry a big stick.
|
|
|
|
|
Pauly5
Forum Moderator 
Joined: 11 Mar 2013 Location: Titahi Bay Status: Offline Posts: 1741 |
Post Options
Thanks(0)
Quote Reply
Posted: 07 Sep 2023 at 5:19pm |
|
This is the stuff I have. It'll last me ages, so a little sachet is no problem.
https://nzsafetyblackwoods.co.nz/en/molybond-ga50-dry-moly-paste-100gm-tube-each--00806208
|
|
|
|
|
KiwiTR6
Senior Member
Joined: 04 Nov 2022 Location: North Island Status: Offline Posts: 447 |
Post Options
Thanks(0)
Quote Reply
Posted: 08 Sep 2023 at 1:13am |
|
Pete, I had a similar experience when I fitted my scope. The fixed sights are on the barrel so you get some semblance of repeatability. However the scope is mounted on the cylinder with an ugly plastic seal in the breech that (in my case at least) didn't allow the breech to close and lock consistantly metal to metal, hence the inability to reproduce or improve on my original groups. For that reason I mounted my red dot on the barrel but that only got me back to where I started with the factory sights and is why I've now replaced that seal with an O-ring. Any improvement yet to be proven as I'm currently Yak-shaving modifying a fixed steady that I had lying around. I have no idea where it came from and it doesn't fit my lathe so I'm now modifying it so that I can use it to crown the barrel. The wall of the cylinder is not very thick. I also want to drill a hole in it somewhere to use a stop in the rear scope ring. I'll take some measurements tonight and post my thoughts.
|
|
|
Daystate Red Wolf .22
FX Dreamline .22 Diana Outlaw .22 HW98 .177 HW30 .177 FWB 124 .177 Diana 35 .177 Diana 340 N-Tec .177 Diana 34 EMS .177 Diana Mod 25 .177 Diana Two Forty .177 Crosman 2240 .22 |
|
|
|
|
RangerPete
Senior Member
Joined: 19 Apr 2023 Location: Cambridge. Status: Offline Posts: 1102 |
Post Options
Thanks(0)
Quote Reply
Posted: 08 Sep 2023 at 3:06am |
|
Pauly, I’d greatly appreciate a little of that fancy stuff, thanks.
Can I pay you for it and the postage? Kiwi, I have no idea what you are currently doing, but it sounds dangerous, I dont think I’d like to try shave a Yak! Stay safe buddy. And please let me know if u think that cylinder is thick enough to safely drill a recoil lug stop hole in 👍🏻 |
|
|
Walk quietly, but carry a big stick.
|
|
|
|
|
KiwiTR6
Senior Member
Joined: 04 Nov 2022 Location: North Island Status: Offline Posts: 447 |
Post Options
Thanks(1)
Quote Reply
Posted: 08 Sep 2023 at 3:33am |
|
https://youtu.be/8fnfeuoh4s8?si=YnkSgcicKnAyrYi6
|
|
|
Daystate Red Wolf .22
FX Dreamline .22 Diana Outlaw .22 HW98 .177 HW30 .177 FWB 124 .177 Diana 35 .177 Diana 340 N-Tec .177 Diana 34 EMS .177 Diana Mod 25 .177 Diana Two Forty .177 Crosman 2240 .22 |
|
|
|
|
jwabfrog
Senior Member

Joined: 13 Nov 2021 Location: Thames Status: Offline Posts: 173 |
Post Options
Thanks(0)
Quote Reply
Posted: 08 Sep 2023 at 4:14am |
|
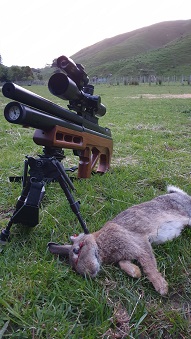
I get similar battery life on my NV008. I'm not sure how much power is consumed by the IR torch vs the scope itself. I haven't bothered using a separate IR torch as the built in torch is more than adequate for ranges up to 150yds on bunnies.
If you're after a batteries, you can disassemble old laptop battery packs - these hold multiple 18650s but will often include a few duds. Check the voltage of each cell before charging and again after charging to monitor voltage drop. Google has plenty of info on how to do this. If you need a charger I can recommend the ISDT C4 Evo - you can buy here:
https://www.kiwiquads.co.nz/product/isdt-c4-evo-charger-for-aaa-aa-18650-21700/ They are super flexible on battery chemistries and sizes so good for charging a variety of batteries. |
|
|
|
|
J-S
Senior Member
Joined: 20 Oct 2014 Location: Auckland Status: Offline Posts: 507 |
Post Options
Thanks(0)
Quote Reply
Posted: 08 Sep 2023 at 4:16am |
Brilliant
|
|
|
J S Airguns
Air Arms TX200('s) Theoben Sirocco HW77 FWB 300s Webley Patriot One or two others... Current projects: Too many.. |
|
|
|
|
KiwiTR6
Senior Member
Joined: 04 Nov 2022 Location: North Island Status: Offline Posts: 447 |
Post Options
Thanks(0)
Quote Reply
Posted: 08 Sep 2023 at 4:25am |
|
I have one of these that does multiple battery sizes. It works brilliantly. https://www.trademe.co.nz/a/marketplace/electronics-photography/video-cameras/security-spy-cameras/listing/4303252340
|
|
|
Daystate Red Wolf .22
FX Dreamline .22 Diana Outlaw .22 HW98 .177 HW30 .177 FWB 124 .177 Diana 35 .177 Diana 340 N-Tec .177 Diana 34 EMS .177 Diana Mod 25 .177 Diana Two Forty .177 Crosman 2240 .22 |
|
|
|
|
kruzaroad
Senior Member
Joined: 03 Jul 2022 Location: Hastings 4 now Status: Online Posts: 2988 |
Post Options
Thanks(0)
Quote Reply
Posted: 08 Sep 2023 at 5:23am |
|
So it turns out on my specimen of a gun, that the cylinder does not sit flush with the ribbing in the gun.
Basically the rib next to the rear stock to cylinder screw, sits higher, causing quite a few of the end/middle ribs to be doing nothing. Seems the most likely cause of why the barrel is pointing slightly downwards. When I checked the square of the barrel out of the stock in relation to to the cylinder, closed, it was strait as far as I could see against a flat edge. Now a good man with new dremel such as me self, would level it down. I on the other hand (still not have gotten around to my shock gel experiment) , have instead gone absolutely mental with a silicone so the cylinder now has a silicone bed between it and the stock. This has also filled the gaps between ribs and stock. Also built up just behind the last rib where the screw goes through stock for extra contact. Will it work your guess is as good as mine, find out in 24 hours when it cures. My theory being that I'll now have a more even dispersal of the shock and a better all round contact to stock. Went to town on the central pin through piston, and smoothed it all down, the crap they coated it with is rough as. Hopefully now it will have much less grip going through the guide. Haven't put trigger adjusting screw through front of trigger gaurd as I didn't realise how far back the trigger sits, that may not be viable, will see later. All number 8 wire here! |
|
|
|
|
kruzaroad
Senior Member
Joined: 03 Jul 2022 Location: Hastings 4 now Status: Online Posts: 2988 |
Post Options
Thanks(0)
Quote Reply
Posted: 08 Sep 2023 at 8:22am |
|
Got bored and fired some random pellets I had.
Best were some target pellet, 14mm x 16mm at 10m. Only 4 and just put in and fired. Rest were about 20 to 30mm, treated the same way grab a few and fire. Pin keeps dropping out of open sight which sux. But for a bunch of random pellets just fired it's heaps tighter in grouping. Now need to find a pellet to use before fine tuning. Oh ran a self tapping screw through trigger gaurd and have probly the lightest trigger of any of the rifles. Positively scary. Hasn't fired on closing so will leave it there. |
|
|
|
|
Billbobnz
Senior Member
Joined: 14 Jun 2020 Location: Ashburton Status: Offline Posts: 938 |
Post Options
Thanks(0)
Quote Reply
Posted: 08 Sep 2023 at 9:41am |
|
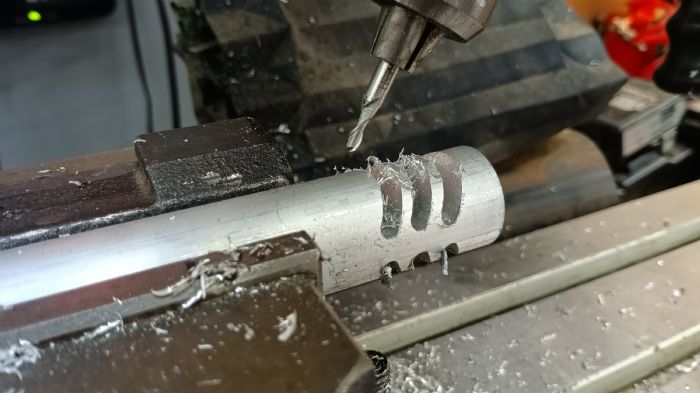
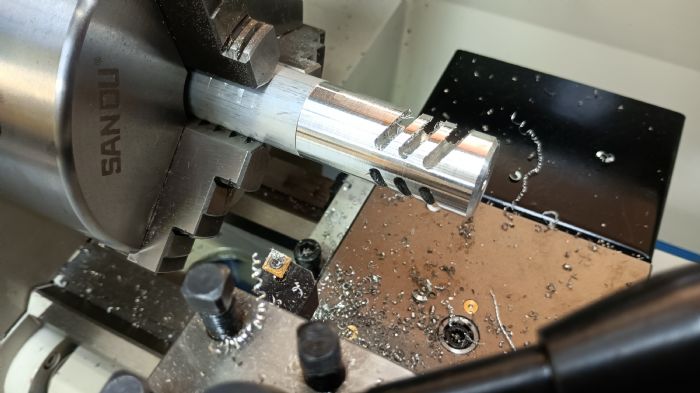
Well I've decided to make a muzzel brake for mine...... Clearly only cosmetic haha
|
|
|
|
|
KiwiTR6
Senior Member
Joined: 04 Nov 2022 Location: North Island Status: Offline Posts: 447 |
Post Options
Thanks(0)
Quote Reply
Posted: 08 Sep 2023 at 10:15am |
|
Pete, a couple of photos for you. I want the rear ring for my Tasco to sit at the rearward extreme of the dovetail grooves which places the lock pin and hole to suit well clear of the piston stroke and into the plastic spring stop/trigger block area. The first yellow dot from the RH side in the pic is where the usable part of the grooves end. The middle dot is where I'll drill for the stop. The LH mark is where the plastic plug ends which is 59mm from the open end of the cylinder. The cylinder wall is 2.0mm thick (a little more than I thought). After drilling make sure you clean any sharp edges from the hole on the inside or you will damage components when you remove and reinstall them. 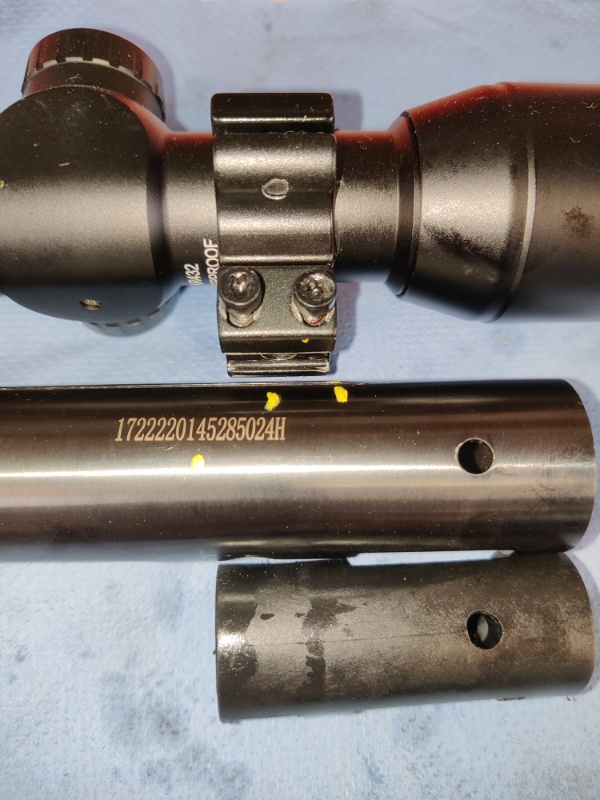 |
|
|
Daystate Red Wolf .22
FX Dreamline .22 Diana Outlaw .22 HW98 .177 HW30 .177 FWB 124 .177 Diana 35 .177 Diana 340 N-Tec .177 Diana 34 EMS .177 Diana Mod 25 .177 Diana Two Forty .177 Crosman 2240 .22 |
|
|
|
|
kruzaroad
Senior Member
Joined: 03 Jul 2022 Location: Hastings 4 now Status: Online Posts: 2988 |
Post Options
Thanks(0)
Quote Reply
Posted: 08 Sep 2023 at 12:14pm |
|
It will complement the stock colour well Billbob.
Being a fan of the ironic, can't think of a gun more suited to the irony. 😂 |
|
|
|
|
Post Reply
|
Page <1 1112131415 23> |
 Tweet
Tweet
|
| Forum Jump | Forum Permissions You cannot post new topics in this forum You cannot reply to topics in this forum You cannot delete your posts in this forum You cannot edit your posts in this forum You cannot create polls in this forum You cannot vote in polls in this forum |


 Topic Options
 KiwiTR6 wrote: